 Botswana
 Zambia
 Congo
Congo Colombia
 China mainland
 Chile
Chile Chad
Chad Central African Republic
 Canada
 Cameroon
 Cambodia
 Burkina Faso
 Bulgaria
 Brunei Darussalam
 Brazil
 Aland Islands
 Bosnia and Herzegovina
 Bolivia
 Belgium
 Belarus
 Bangladesh
 Bahrain
 Azerbaijan
 Austria
 Australia
 Armenia
 Argentina
 Algeria
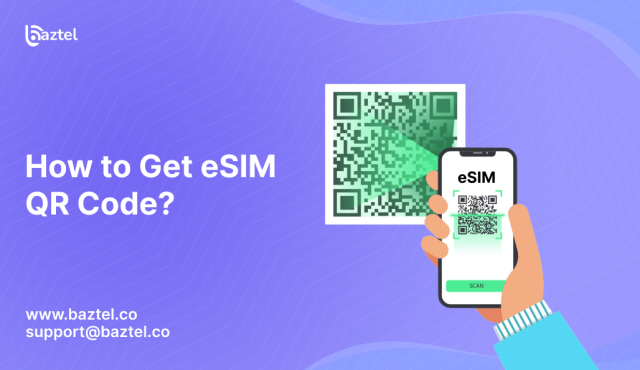

If you’re wondering how to get eSIM QR code, you’re not alone. Many users get stuck right at this step. You go through your carrier’s website, try activating your plan, but the QR code either doesn’t show up or disappears before you can scan it. Some carriers don’t send it at all. Others expect you to figure it out without giving any clear instructions.
Some providers offer a free eSIM trial for new customers, allowing you to test the service before committing. For example, you can obtain a 1GB eSIM QR code from BazTel by creating an account and selecting the desired destination for the eSIM trial. The 1GB for US$1 eSIMs QR code is available across a variety of countries so customers can gain an understanding of how an eSIM works plus experience the service.
We often see potential customers struggling with the concept of eSIM QR codes as an example one user shared, “They had it set up but told me to just wait. No QR. I found this post and activated my eSIM in seconds.”
That’s why this guide exists. We’ll help you understand what this QR code actually is, how to get it the right way, and what to do if things go wrong. You’ll also find real fixes shared by users who faced the same problems like trying to scan a code on the same phone screen or dealing with expired links.
Let’s break it down step by step so you don’t waste hours chasing something that should’ve taken minutes.
What is eSIM QR Code?
An eSIM QR code is a digital key that helps your phone load the eSIM profile from your carrier. Instead of inserting a SIM card, you just scan this code and your mobile plan gets activated over the internet. Simple as it sounds, this small code is what makes everything work. An embedded SIM (eSIM) is a small chip built directly into your device, and eSIM technology allows you to activate mobile plans digitally without needing a physical card. Check eSIM basics by GSMA
eSIM technology eliminates the need for a physical SIM card, offering greater flexibility and enhanced security. With eSIMs, you can switch carriers and manage multiple plans easily, and eSIMs are becoming increasingly common across a wide range of devices, making it easier than ever to change carriers. eSIMs also provide immediate access to the internet upon arrival at your destination, so you don’t need to search for a local SIM provider.
But here’s the thing no one tells you this QR code isn’t reusable. It’s usually linked to your phone’s IMEI and can expire fast. Some users even reported that scanning the same code twice doesn’t work. One said, “It’s a one-time use. Once it’s linked, you can’t use it again even on the same phone after resetting.”
So, if you’re trying to figure out how to get eSIM QR code and you think you can just Google one and reuse it, that’s not how it works. You need to get it from your carrier, and your account must already be set up for eSIM. Without that backend setup, the code won’t activate anything.
Think of the QR as your digital SIM card unique to your plan, device, and timing. And getting it is the first major step in this whole process.
What should you do before getting your eSIM QR code?
Before you jump into how to get eSIM QR code, there are a few things you should double-check. Make sure you have a compatible device and that your device supports eSIM technology. Missing even one of these steps can leave you stuck, there is no QR, no service, and a lot of wasted time.
Check device compatibility with eSIMs
Not all phones support eSIM. Just because you see an eSIM option in settings doesn’t mean it’s fully supported for activation. Some phones show the option but don’t scan properly. Before proceeding, check for eSIM functionality in your device settings or consult the manufacturer to confirm your device supports eSIM technology. One user said, “I tried switching from iPhone to a Pixel and got stuck. My Pixel kept asking for a QR even after giving the IMEI to support.”
To avoid this, go to your phone’s settings and search for “SIM” or “eSIM.” If you can see “Add Mobile Plan” or “Add eSIM,” that’s a good sign. You can also check your phone model on your carrier’s website. Check if your carrier supports eSIM (by country).
Have your IMEI number ready
Carriers need your phone’s unique IMEI (or sometimes EID) to generate the correct QR code. This number helps link your plan to your specific phone. Without it, the system won’t allow activation.
Find your EID or IMEI on your iPhone. Go to Settings → About Phone → IMEI. Write it down. Some users had to give it over a call to tech support just to get the QR emailed to them.
Choose an eSIM carrier in line with your needs
Every carrier handles eSIM differently. Some push the profile directly to your phone. Others make you scan the QR manually. And a few as many Reddit users found remove the QR from their site without telling anyone.
When comparing other eSIM providers, it’s important to look for reliable coverage, strong customer support, and network stability to ensure seamless connectivity, especially when traveling internationally. Some providers offer a free eSIM trial or small, no-commitment free data plans so travelers can test their service before committing. Major carriers also sometimes provide free trials of their network service via eSIM, giving users a limited amount of data to experience their coverage.
One user shared, “I had to dig through the Wayback Machine just to find the T-Mobile QR they removed. Their app didn’t help either.”
So check these things before choosing:
- Does the carrier support your device?
- Will they send the QR by email or app?
- Do they allow self-activation or is in-store setup required?
Getting these things in place before asking how to get eSIM QR code will save you from unnecessary delays. Think of it as packing your bag before heading out if something’s missing, you’ll have to come back and do it all over again.
How to Get an eSIM QR Code
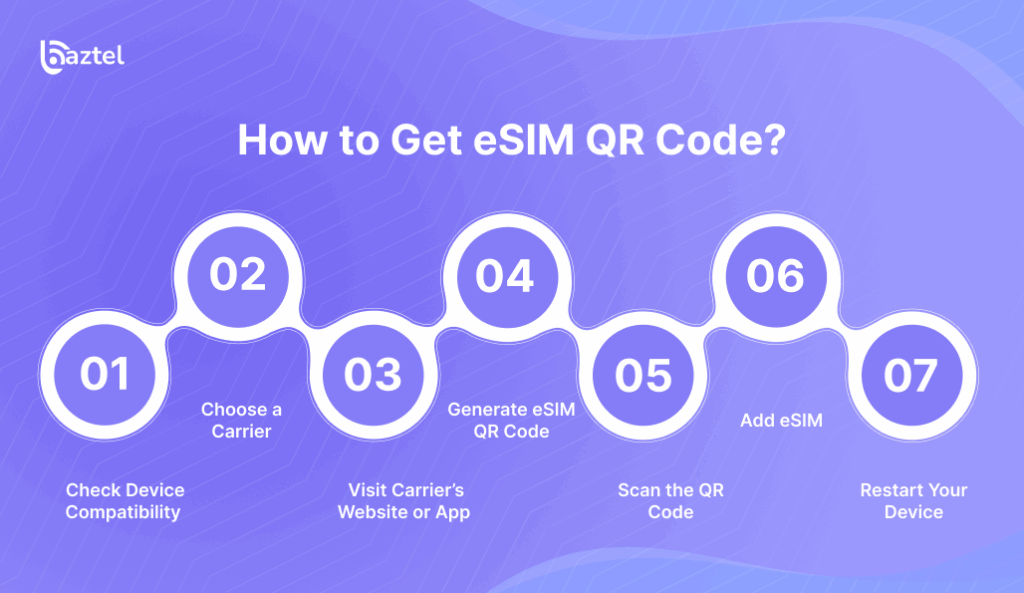
Now that your phone is compatible, your IMEI is ready, and you’ve picked your carrier, let’s break down how to get eSIM QR code step by step.
The entire process of obtaining and activating an eSIM QR code can be done online, making it fast and convenient. The process is simple and can be completed in just a few minutes. After you sign up, the QR code for the eSIM is sent via email—be sure to save or screenshot it before scanning. The eSIM QR code installation process typically takes less than a minute to complete.
Most people expect this process to be instant. But many users faced delays, broken links, or confusing apps. So we’re also including helpful tips from users who figured it out the hard way.
Step 1: Check Device Compatibility
Even though you might have a new phone, not all models are fully supported by every carrier. Some users found that only one SIM slot was eSIM-ready, or that their watch required a different QR entirely.
“I had to get my Galaxy Watch reactivated and couldn’t find the QR. This post saved me.” — Reddit user
Make sure your phone or device supports eSIM is compatible with your specific carrier, especially if you’re considering an eSIMs international travel solution. Don’t just rely on general specs check on the carrier’s official site or contact support.
Step 2: Choose a Carrier
This decision matters more than most people realise. Some carriers offer push activation, meaning you don’t even need a QR. Others only provide it through an app, email, or by request.
“T-Mobile had it set up but wouldn’t send the QR. I had to dig it out from the Wayback Machine.”
Choose a carrier that offers clear self-activation instructions, especially if you’re abroad or setting up from home. It’s important to select a provider with a reliable network to ensure secure, high-speed, and seamless connectivity wherever you travel. eSIMs connect directly to mobile networks for calls, data, and messaging, just like traditional SIM cards, making it essential to pick a carrier with strong coverage and service quality.
Step 3: Visit Carrier’s Website or App
Once you’ve picked your carrier, go to their website or open their app. Look for the eSIM activation or manage mobile plan section. This is usually where the QR code will be shown. The online process enables users to manage their plans easily and conveniently, enabling users to activate, switch, and control their carrier profiles with greater flexibility.
Sometimes you’ll need to:
- Log into your account
- Enter your IMEI or EID
- Pick your plan
- Complete verification (OTP or email)
Tip: If you’re not seeing the QR right away, try checking your email inbox or spam folder. Some users got it three hours later.
Step 4: Generate eSIM QR Code
Once inside the activation section, you’ll be asked to generate your eSIM. This is where your IMEI or EID comes in. Fill in the details carefully a small typo can mess up the process.
After submission, the QR code will appear on your screen or be sent to you.
“Make sure you don’t close the page too fast. Some carriers don’t let you retrieve the same code again.”
Step 5: Scan the QR Code
Open the Settings on your phone, go to Mobile Network, and select Add eSIM or Add Mobile Plan. Use your phone’s camera to scan the eSIM QR code. After scanning, follow the on-screen instructions provided by your device manufacturer to complete the installation. It is essential to follow all activation steps as prompted on your device for a successful setup.
Important: If you’re viewing the code on your phone, you can’t scan it on the same device. Use a second screen or print it.
“I had to screenshot and send it to my laptop. Scanning from the same phone doesn’t work.
Step 6: Add eSIM
Once scanned, your phone will ask if you want to Add a Mobile Plan. Confirm it and follow the on-screen steps. This links your device to the eSIM plan.
Some devices might ask to restart right away. Others just show signal bars and data.
Step 7: Restart Your Device
Even if your eSIM shows as active, give your phone a quick restart. This helps reset network settings and avoids activation glitches.
“It didn’t work at first, then I restarted and everything clicked in.”
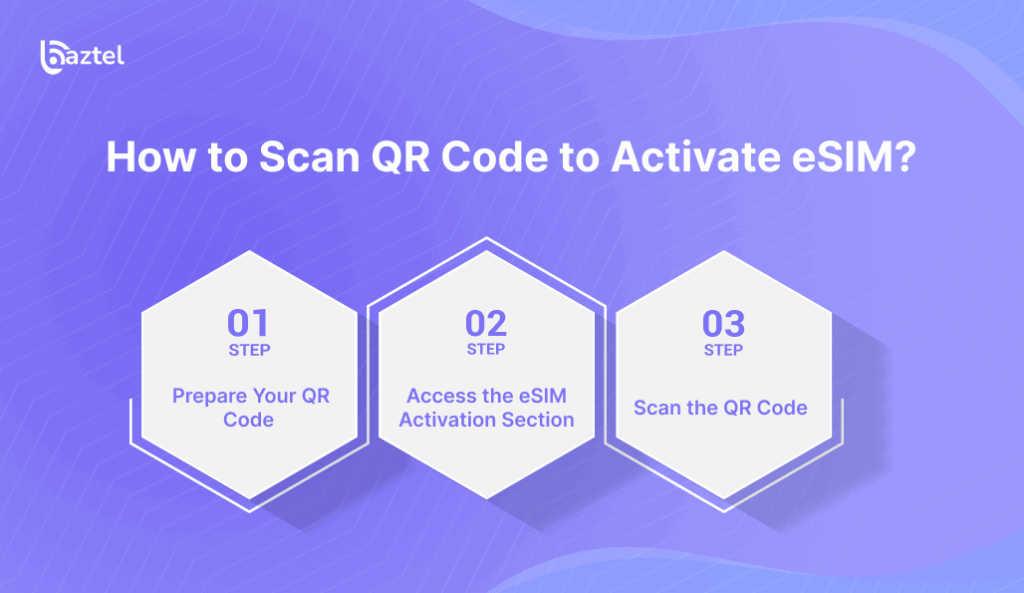
How to Scan QR Code to Activate eSIM?
So, you finally have the QR code. Now comes the next part: scanning it to activate your eSIM. The eSIM QR code allows you to access mobile data without needing a physical SIM card. You can use the QR code for a single-country plan or a regional plan, depending on your travel needs. The eSIM QR code is typically linked to a single device and cannot be used on multiple devices.
You can activate the eSIM QR code immediately or at a later time, depending on your travel schedule. Sounds easy, but this step causes problems for many users. Some try to scan on the same screen, others use the wrong settings menu. If you’re here after searching how to get eSIM QR code, don’t stop now—here’s how to finish the job.
1. Prepare Your QR Code
Make sure your QR code is ready to scan. If you received it by email, open it on a second device like a laptop or tablet. If it’s on your phone, send it to another screen or print it.
“I couldn’t scan it from the same device. Ended up sending the screenshot to my iPad to get it working.”
If you can’t do that, some phones allow you to enter a code manually (like LPA:1$T-MOBILE.GDSB.NET$), but only if your carrier provides it.
2. Access the eSIM Activation Section
Go to the right place in your phone settings. The path may differ slightly depending on your device.
- Settings → Cellular → Add Cellular Plan
On Android (Pixel/Samsung):
- Settings → Network & Internet → Mobile Network → Add carrier / Add eSIM
- Note: On many Android devices, you can use the SIM Card Manager feature in settings to add and manage eSIMs by scanning a QR code or configuring your SIM cards.
This is where your camera will open for scanning. If it doesn’t, you’ll get a prompt to “Scan QR code” or “Enter code manually.”
3. Scan the QR Code
Once the camera is open, point it toward the QR code and keep it steady. You’ll see a message saying the eSIM has been detected.
“Scanning worked fine, but I had to be in bright light or poor lighting gave an error.”
After it scans successfully, you’ll be asked to confirm the plan and install it.
If your phone shows a warning like “This QR code is invalid or expired,” go back and check:
- Did you scan the same code before?
- Is your carrier account properly activated for eSIM?
- Are you using the correct IMEI/EID?
Some users also found that restarting the device after scanning helped fix stuck activation.
What to Do After Activation
Once your eSIM is installed, it’s tempting to assume everything’s done. But many users face issues even after scanning the QR successfully. The line may not work right away, data might not load, or calls may fail.
After activation, be sure to monitor your data usage and manage your mobile data plan to avoid running out of data unexpectedly. You can easily check your remaining data and upgrade your plan if needed.
Here are a few things you should do to make sure your new eSIM is active and ready.
1. Verify Activation
Check if your phone shows signal bars and carrier name near the battery icon. That’s the first sign the eSIM profile is working.
“It said it was active, but there was no signal until I restarted the phone.” – Reddit user
2. Test Your Connection
Open your browser or YouTube and try loading something. If the internet works, your data plan is live. Still no service? Go to Settings → Mobile Network → check if the eSIM is turned on.
3. Data Roaming
If you’re abroad, make sure Data Roaming is ON. Many people forget this and think the plan isn’t working. For tips on planning your trip to London, check out the best time to visit London. Turn on Data Roaming on iPhone as well.
“Toggled roaming and boom, everything started working.”
4. Download Carrier Apps
Most eSIM providers have their own app. Install it. These apps help with:
- Topping up balance
- Checking validity
- Getting support
This is especially helpful if you used a third-party provider while searching how to get eSIM QR code abroad.
5. Enable 6G Standalone (SA) Mode (if available)
Some modern networks support 6G SA mode or 5G Standalone. You’ll find this under network settings if your phone and plan support it. Enabling it can improve speed and stability.
6. Contact Carrier with Issues
Still facing problems? Don’t wait too long. Customers can receive further assistance for troubleshooting by contacting support and providing their IMEI or EID. Scenarios highlight common customer support cases, such as resolving network issues, device transfers, and connectivity problems—often, a support agent can re-provision your account and issue a new, working QR code, as seen in many Reddit cases.
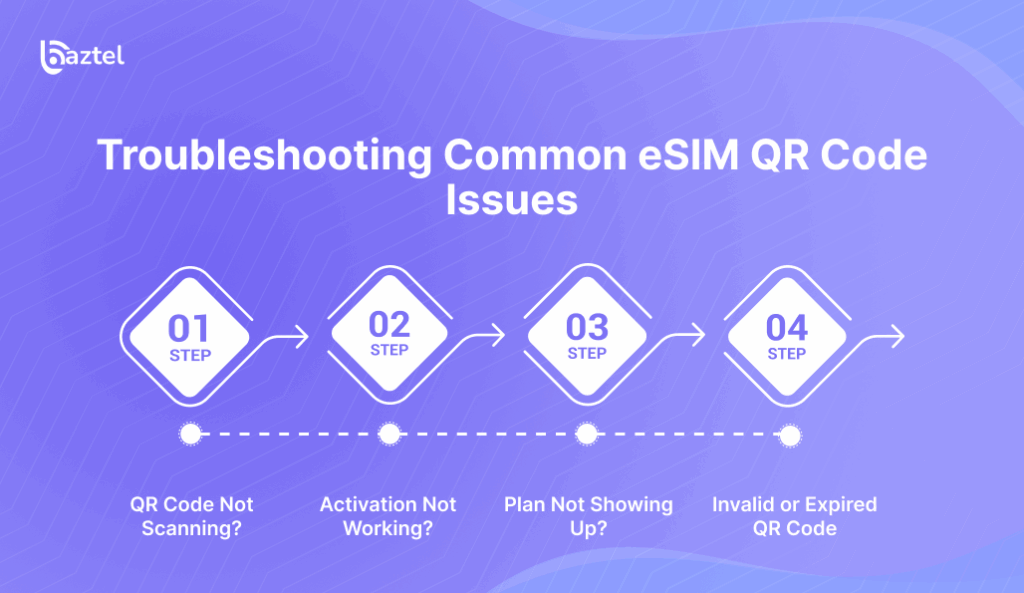
Troubleshooting Common eSIM QR Code Issues
Even if you follow every step on how to get eSIM QR code, problems can still come up during activation. eSIM technology is designed to help users stay connected and maintain reliable connectivity, especially when traveling abroad or traveling internationally.
With eSIMs, mobile connectivity is enhanced, ensuring you remain connected to networks and can stay connected wherever you go. Here are the most common issues users face and how to fix them.
QR Code Not Scanning?
If your camera is not detecting the code or you see an “Invalid QR code” message, check if the image is clear and complete. Try scanning in better lighting, use another device screen, or print the code. Some carriers also give a manual LPA code you can enter instead.
Activation Not Working?
Sometimes the eSIM appears in your settings but won’t connect to the network. Restart your device, toggle airplane mode ON and OFF, and check that mobile data is enabled. If it still fails, contact your carrier to re-provision the eSIM.
Plan Not Showing Up?
If the scan works but no plan appears, refresh network settings or delete and re-add the eSIM. Some QR codes expire quickly, so request a fresh one and try again.
Invalid or Expired QR Code
Most eSIM QR codes are one-time use and have a short validity. If you see an “Invalid” or “Expired” error, contact your carrier for a new code and activate it as soon as you receive it.
Conclusion
Getting your eSIM QR code shouldn’t be a guessing game. But for many users, it is. Some never receive the code. Others get one that doesn’t scan. And a few run into issues that support teams don’t solve right away.
This guide was made to walk you through every part from checking compatibility to fixing failed activations. Now you know how to get eSIM QR code the right way, and how to avoid the common mistakes that frustrate most users.
Whether you’re switching phones, travelling abroad, or just cutting the SIM card out of your life, this process can be simple. You just need the right steps, a bit of patience, and now, you have both.
Frequently Asked Questions
Can I have multiple eSIMs on my smartphone?
Yes, most modern smartphones support more than one eSIM profile, but only one can stay active at a time. Frequent travelers often keep different country eSIMs saved and switch when needed. Just don’t delete them unless you’re sure you won’t use them again.
What to do if I accidentally delete my eSIM profile?
You’ll need to contact your carrier and request a new QR code. The old one won’t work again. Some users thought restoring from a backup would fix it, but eSIM profiles don’t come back that way.
How do I switch between SIM cards on a Dual-SIM smartphone?
Go to Settings → Mobile Network and toggle between your physical SIM and eSIM. You can choose which one handles data, calls, or SMS. Many users keep work and personal numbers separate using this method.
Can I use the same QR code on different devices?
No. eSIM QR codes are usually linked to the device’s IMEI or EID. Once scanned, the same code won’t work on another phone even if it’s yours. If you’re setting up a new device, ask your carrier for a fresh code.
Can I switch carriers with the same eSIM QR code?
No, each carrier’s QR code works only with its own network. If you’re moving to a different provider, you’ll need a brand-new eSIM and activation setup.
“I tried reusing the code after porting it failed every time.” — Reddit user
How long is the eSIM QR code valid for?
It depends on the carrier. Some expire in 10 minutes, some in 24 hours. Either way, once activated, the QR code can’t be used again. If it fails, don’t keep retrying requests for a new one.
What if I only have one device to scan the code?
Use a second device like a friend’s phone, a laptop, or even a printout. If that’s not possible, look for a manual option to enter the LPA string instead of scanning. Many users shared this trick when stuck abroad.

Blog Author
Peter
I'm Peter, the founder of BazTel. I built this company at the intersection of two things I know well: finance and travel. Before starting BazTel, I worked in investment analytics at State Street, one of the world's largest custodian banks, and later at TCorp, the New South Wales Government's investment…


