Botswana
 Zambia
 Congo
Congo Colombia
 China mainland
 Chile
Chile Chad
Chad Central African Republic
 Canada
 Cameroon
 Cambodia
 Burkina Faso
 Bulgaria
 Brunei Darussalam
 Brazil
 Aland Islands
 Bosnia and Herzegovina
 Bolivia
 Belgium
 Belarus
 Bangladesh
 Bahrain
 Azerbaijan
 Austria
 Australia
 Armenia
 Argentina
 Algeria
Last week, I was trying to show a colleague how to adjust a specific setting on her Samsung phone. After three attempts at explaining it over Slack, I realized a screen recording would save us both the headache. That’s when I discovered just how straightforward Samsung’s built-in screen recorder really is.
Whether you need to capture gameplay, create a tutorial, save a video call moment, or document a bug for tech support, knowing how to screen record on Samsung phones is incredibly useful. Samsung Galaxy phones running One UI 2.0 or later come with a native screen recorder that eliminates the need to install third-party apps from the Play Store. In this guide, I’ll walk you through everything you need to know about screen recording on your Samsung device.
What You Need to Screen Record on Samsung
Before we dive into the steps, let’s cover the basics. The built-in screen recorder is available on most modern Galaxy phones and tablets. Your Samsung phone needs to be running One UI 2.0 or later (based on Android 10+). This includes Galaxy S10, S20, S21, S22, S23, S24, S25 series, Note 10 and Note 20 models, Z Fold and Z Flip foldables, and select A-series models like the A25 5G, A35, A54 5G, A53 5G, A52 5G, and A32 5G.
Not all Samsung phones support screen recording natively. Lower-end A-series models (like A13, A14, A16, A17) typically don’t include this feature. If you can’t find the screen recorder on your device, you’ll need to download a third-party app, which I’ll discuss later.
How to Screen Record on Samsung Phone: Step-by-Step
The easiest method to record your screen uses the Quick Panel, which is Samsung’s control center for quick settings. Here’s exactly how to do it:
Step 1: Open the Quick Panel
Swipe down from the top right side of your screen to access the Quick Panel. You can also swipe down twice from anywhere on the notification bar to expand the full panel. The screen recorder icon looks like a small camera or recording symbol.
Step 2: Find the Screen Recorder Icon
Look through your Quick Panel icons for the screen recorder. On my Galaxy S24, it’s displayed on the first page, but your layout may differ depending on how you’ve customized your quick settings. If you don’t see the icon immediately, swipe left to check the second page of toggle buttons.
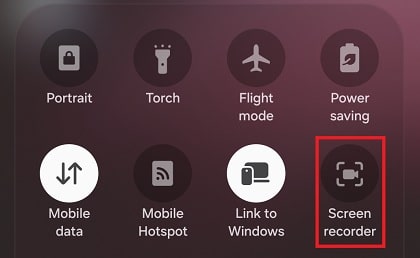
Step 3: Add Screen Recorder to Quick Panel (If Missing)
Can’t find the screen recorder icon anywhere? Don’t worry – you might just need to add it. Tap the three-dot menu icon or pencil icon at the top of the Quick Panel, then select “Edit buttons” or “Button order.” You’ll see a list of available buttons below your current panel. Locate “Screen recorder” in the available buttons section, then touch and hold it. Drag the screen recorder icon up to your active Quick Panel, placing it wherever you’d like. Tap “Done” to save your changes.
Step 4: Choose Your Sound Settings
Once you tap the screen recorder icon, a menu pops up with sound settings. This is where you decide what audio gets captured in your recording. You have three options:
No sound – Records video only, with no audio captured. I use this when I just need to demonstrate visual steps.
Media sounds – Captures all system audio from your phone, including apps, games, and video playback. Perfect for recording gameplay or capturing videos.
Media sounds and microphone – Records both system audio and your voice through the device microphone. This is helpful when you’re narrating a tutorial or adding commentary.
Select your preferred audio option, then tap “Start recording.”
Step 5: Start Recording
After you tap start, a countdown appears for a few seconds (usually three seconds) giving you time to navigate to whatever you want to capture. The countdown automatically begins the recording once it finishes. A small floating toolbar appears at the top of your screen showing recording controls.
Step 6: Use Recording Features While Capturing
While recording, you’ll see a control panel displayed at the top right corner of your screen. This panel won’t appear in your final video – it’s just for you to control the recording. The toolbar includes several useful tools:
The pencil icon lets you draw or write on the screen during recording. Tap it to access eight different color options, then use your finger or S Pen to annotate. This is incredibly helpful for highlighting specific areas. When you tap the pencil icon again, the drawing mode stops and you can interact with apps normally.
The camera icon (it looks like a person) activates your front-facing camera, adding a small selfie video overlay to your recording. This creates a picture-in-picture effect where you’re visible in a corner of the screen. You can touch and drag this video window to reposition it anywhere on your screen. The selfie video size can be adjusted in settings.
The pause button lets you temporarily stop recording without ending it. This is useful when you need a moment to set up the next part of your demonstration.
Step 7: Stop the Recording
When you’re finished, tap the stop icon (a square button) on the floating control panel. Alternatively, you can swipe down from the top to open the notification bar, where you’ll find a screen recording notification with a stop button. The video is automatically saved to your Gallery app in a “Screen Recordings” folder.
Where to Find Your Screen Recordings
After you stop recording, you might wonder where the video went. Samsung saves screen recordings in multiple places for easy access. Open the Gallery app on your phone and look for the “Screen Recordings” album. All your captured videos will be stored here alongside your photos and other videos.
Additionally, you can find recordings through the My Files app. Open My Files, tap “Internal storage,” then navigate to the DCIM folder. Inside, you’ll find a “Screen Recordings” folder containing all your saved videos. This is particularly useful if you want to move recordings to an SD card or transfer them to another device.
Customizing Screen Recorder Settings
Samsung lets you customize several aspects of screen recording to match your needs. I recommend exploring these settings before you start any important recording. To access screen recorder settings, open the Quick Panel and touch and hold the screen recorder icon. This opens the settings page directly. Alternatively, go to Settings, then select “Advanced Features,” and tap “Screenshots and screen recorder.”
Available Customization Options:
Record sound – Set your default audio preference (None, Media, or Media and mic). This saves you from selecting it each time you record.
Video quality – Choose between High (1080p), Medium (720p), or Low (480p). Higher quality creates larger file sizes but better image clarity. I typically use 1080p for professional content and 720p for quick captures.
Selfie video size – Adjust how large your front camera overlay appears when using the person icon. Five different size levels are available, though this option only appears on devices that support front camera recording during screen capture.
Show taps and touches – Toggle this on to display small dots whenever you touch or tap the screen. This is extremely helpful for creating tutorial videos where viewers need to see exactly where you’re tapping.
Save screen recordings in – Select where recordings should save (Internal storage or SD card, if available). Note that this option isn’t available on all devices.
Why Can’t I Find the Screen Recorder on My Samsung?
This is one of the most common questions I see. If you’ve searched everywhere and still can’t locate the screen recorder, several reasons might explain why.
Device Compatibility Issues
Not all Samsung phones include the native screen recorder. Budget A-series models (A10, A13, A14, A16, A17, A20) often lack this feature. Samsung typically reserves screen recording for mid-range and flagship devices. If you have one of these lower-end models, the feature simply isn’t included in your device’s software.
Software Version Requirements
Your phone needs One UI 2.0 or later to support screen recording. Older devices running Samsung Experience or One UI 1.0 won’t have this capability. To check your software version, go to Settings, then “About phone,” and look at your One UI version and Android version.
System App Disabled
Sometimes the screen recorder system app gets accidentally disabled. Go to Settings, then Apps, and tap the menu button (three dots). Select “Show system apps” to view all system applications. Scroll through the list and search for “Screen Recorder” or “Samsung Capture.” If you find it and it shows as disabled, tap it and select “Enable.” Restart your phone after enabling it.
Software Updates Needed
Occasionally, Samsung rolls out screen recording features through software updates. Go to Settings, select “Software update,” then tap “Download and install” to check for available updates. I’ve seen cases where mid-range models gained screen recording capabilities after updating from One UI 3 to One UI 4.
Alternative Methods for Older Samsung Devices
If your Samsung phone doesn’t support the native screen recorder, you have several alternative options. While I generally prefer built-in tools, these third-party apps work well when needed.
Third-Party Apps from Play Store
Several reliable screen recording apps are available. AZ Screen Recorder is a popular choice that’s lightweight and offers good functionality. XRecorder provides similar features with a user-friendly interface. When selecting a third-party app, read reviews carefully and check the permissions it requests. I avoid apps that demand excessive access to your data or display intrusive ads.
To install a screen recording app, open the Play Store on your device, search for “screen recorder,” and read user reviews before selecting one. Download and install your chosen app, then grant the necessary permissions for screen recording and storage access. The exact steps to record will vary by app, but most follow a similar pattern to Samsung’s native recorder.
Game Launcher Method
Some older Samsung phones have screen recording available through Game Launcher, even if they lack the system-wide feature. To use this method, go to Settings, then “Advanced Features,” and toggle on Game Launcher if it isn’t already enabled. Open Game Launcher from your app drawer, then tap the menu and select “Add apps.” You can add non-game apps to Game Launcher, then use its built-in recording feature to capture their screens.
Common Screen Recording Issues and Solutions
Through my own experience and helping others, I’ve encountered several common problems. Here’s how to solve them:
Recording Without Sound
If your screen recordings have no audio, check your sound settings before starting. When you tap the screen recorder icon, make sure you’ve selected either “Media sounds” or “Media sounds and mic” instead of “No sound.” Keep in mind that screen recorder won’t capture audio during phone calls or VOIP calls due to privacy restrictions.
Recording Blocked by Certain Apps
Some apps block screen recording due to copyright protection. Netflix, banking apps, and other sensitive applications typically prevent screen capture. You’ll see a black screen or receive an error message when attempting to record these apps. This is intentional and cannot be bypassed without violating app terms of service.
Large File Sizes
Screen recordings at 1080p can create substantial file sizes, especially for longer videos. If storage is a concern, change your video quality to 720p or 480p in the screen recorder settings. You can also transfer completed recordings to cloud storage or an SD card to free up space on your device.
Screen Recording vs Screenshots on Samsung
While we’re discussing screen capture, it’s worth understanding the difference between screen recording and screenshots. Both serve different purposes depending on your needs.
A screenshot captures a single image of whatever’s currently displayed on your screen. To take a screenshot on Samsung, press the volume down button and power button simultaneously. This creates a still image saved to your Gallery. Screenshots are perfect for capturing static information like settings, messages, or website content.
Screen recording captures video of everything happening on your screen over time. Use this when you need to show a process, demonstrate how to navigate an app, or record dynamic content. Additionally, Samsung offers scroll capture for taking extended screenshots of long pages. After taking a regular screenshot, tap the scroll capture icon at the bottom of the screen to automatically scroll and capture more content.
Tips for Better Screen Recordings
After creating countless screen recordings for work and personal use, I’ve learned several techniques that improve the final result. Before starting any recording, close unnecessary apps running in the background. This frees up processing power and prevents unexpected notifications from appearing in your video. Enable “Do Not Disturb” mode to stop calls and messages from interrupting your recording.
Plan what you’re going to show before you hit record. Having a mental outline helps you create cleaner, more focused content. When recording tutorials, speak clearly if you’re using the microphone option, and avoid rushing through steps. Hold your phone steadily or use a phone stand. Movement and shaking make videos harder to watch, especially for longer recordings.
Use the pencil icon strategically to highlight important areas or draw attention to specific buttons or settings. After recording, review your video before sharing it. The Gallery app includes basic editing tools where you can trim unnecessary portions from the beginning or end.
Editing Your Screen Recordings
Once you’ve captured your screen recording, you might want to make some adjustments before sharing. Samsung’s Gallery app provides basic editing capabilities built right in. Open the Gallery app and navigate to your screen recording. Tap the video to open it, then tap the pencil icon or “Edit” button at the bottom of the screen.
The trim tool lets you cut content from the start or end of your video. Drag the sliders to select which portion to keep, then tap “Save” to create your edited version. For more advanced editing features, you can download dedicated video editing apps from the Play Store. Apps like VivaVideo, InShot, or Adobe Premiere Rush offer more comprehensive tools for adding text, transitions, and effects.
Sharing Screen Recordings
Samsung makes it easy to share your screen recordings with others. After stopping a recording, a notification appears with a “Share” option. Tap it to instantly send the video through your preferred app. You can also open the video in Gallery, tap the share icon, and select your desired sharing method.
Common sharing options include messaging apps, email, cloud storage services, and social media platforms. Keep in mind that screen recordings can be large files, especially at high quality. If you’re sharing via email or message, consider using a file-sharing service or cloud storage link for videos longer than a few minutes.
Can All Samsung Phones Screen Record?
This is a question I get asked frequently. The short answer is no – not all Samsung phones can screen record using the native feature. Screen recording capability depends on your phone’s model and software version rather than just being a Samsung phone.
As of 2026, screen recorder is available on flagship Galaxy phones from the S10 series onward, including S20, S21, S22, S23, S24, and S25 models. The Note 10 and Note 20 series support it, as do all Z Fold and Z Flip foldable devices. Selected mid-range A-series phones have the feature, specifically the A25 5G, A35, A54 5G, A53 5G, A52 5G, and A32 5G. Most Galaxy tablets from the Tab S6 onward include screen recording, including Tab S7, S8, S9, S10, S11, and some A-series tablets like Tab A8, A9+, and A11+.
Models that typically don’t support native screen recording include lower-end A-series phones (A10, A13, A14, A16, A17, A20), older flagship models before the S10 series (S8, S9, Note 8, Note 9), and devices running One UI 1.0 or earlier. If you have one of these devices, your best option is using a third-party screen recording app from the Play Store.
Privacy and Security Considerations
Screen recording can inadvertently capture sensitive information, so it’s important to be mindful of privacy. Before sharing any recording, review it carefully to ensure no personal data is visible. This includes passwords, banking information, private messages, addresses, or phone numbers.
Be cautious when recording in apps that display sensitive data. Banking apps, password managers, and email clients often contain information you wouldn’t want to share publicly. Remember that anything visible on your screen gets captured – including notifications that pop up during recording.
When sharing screen recordings for tech support or tutorials, consider editing out any personal information first. Most editing apps allow you to blur or crop sections of your video to protect sensitive content.
The Future of Screen Recording on Samsung
Samsung continues to improve screen recording with each One UI update. One UI 8.5, which is currently in development for release with the Galaxy S26 series, introduces partial screen recording. This feature allows you to select and record just a specific portion of your screen rather than the entire display, making it easier to focus on particular elements without needing to crop the video afterward.
The interface is also getting a visual refresh with a glassmorphic design that better integrates with Samsung’s overall design language. These improvements show Samsung’s commitment to making screen recording more powerful and user-friendly with each software iteration.
Conclusion
Learning how to screen record on Samsung phones opens up countless possibilities for communication, content creation, and troubleshooting. Whether you’re creating tutorials for family members, capturing gameplay moments, documenting software bugs, or preserving important information, the built-in screen recorder provides a reliable and straightforward solution.
The process is simple: open your Quick Panel, tap the screen recorder icon, choose your sound settings, and start capturing. With customizable options for video quality, audio sources, and additional features like drawing and selfie overlay, Samsung’s screen recorder offers flexibility for various use cases.
If your device doesn’t have the native feature, don’t worry – quality third-party alternatives exist in the Play Store. Just remember to review any recording before sharing it to protect your privacy, and explore the customization options to get the best results for your specific needs. I hope this guide has been helpful in getting you started with screen recording on your Samsung device!

Blog Author
Peter
Peter started BazTel.co to make mobile internet easier for travellers. He noticed how tough it was to find good network options while visiting new countries. That’s when he built BazTel — a place where anyone can buy eSIMs online without confusion or long steps. He believes tech should be simple and useful, not complicated. When he’s free, he likes to travel, test BazTel himself, and keep improving it based on real user problems.