Botswana
 Zambia
 Congo
Congo Colombia
 China mainland
 Chile
Chile Chad
Chad Central African Republic
 Canada
 Cameroon
 Cambodia
 Burkina Faso
 Bulgaria
 Brunei Darussalam
 Brazil
 Aland Islands
 Bosnia and Herzegovina
 Bolivia
 Belgium
 Belarus
 Bangladesh
 Bahrain
 Azerbaijan
 Austria
 Australia
 Armenia
 Argentina
 Algeria
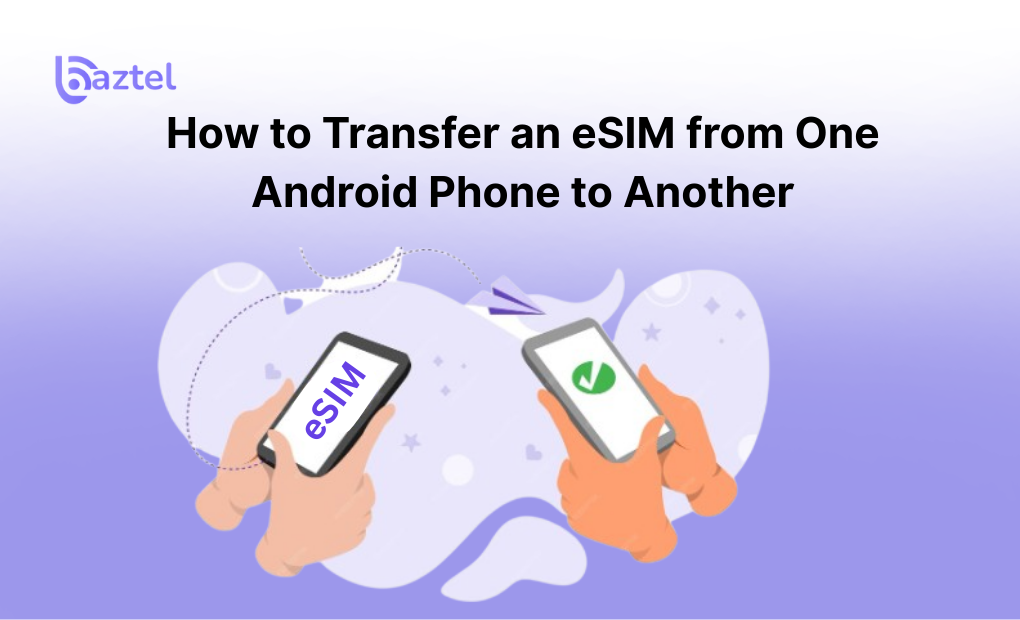
Moving your eSIM from one Android phone to another isn’t as easy as popping out a SIM card. Unlike a physical sim card, which can be easily swapped between devices, eSIM technology is embedded in your android device and offers greater convenience, cost savings, and environmental benefits by eliminating the need for a physical card. However, eSIMs are locked to a single device — and most users only find this out after buying a new phone.
Some get stuck because their carrier doesn’t support direct transfers. Others lose access because the QR code has expired or was never saved. And many don’t know that you often need to delete the old eSIM first before setting it up again. The process involves moving your eSIM profile between Android devices, and ensuring a smooth transition is key to maintaining continuous connectivity.
In this guide, you’ll learn exactly how to transfer an eSIM from one Android phone to another, step by step — using QR codes, manual setup, or your carrier’s app. Whether you’re switching phones or resetting one, we’ll help you do it without losing signal, data, or access to WhatsApp. Before you begin, make sure to check compatibility of your android device to confirm it supports eSIM functionality.
Let’s start by clearing up what’s actually possible.
Can You Move an eSIM to Another Android Phone?
Yes — but not the way most people expect.
Unlike physical SIMs, an eSIM card is digitally tied to your phone’s hardware, and not all Android phones have eSIM support. That means you can’t just copy or clone your eSIM from one Android phone to another. You need to either re-activate it using a QR code or get a new activation link from your carrier.
During the transfer process, always follow your carrier’s instructions and check the eSIM settings in your service provider’s app or website for specific steps. Some devices, like Google Pixel, may have device-specific transfer process steps. Note that automatic transfer or quick transfer features are not yet standard on Android devices, so you will usually need to manually uninstall and reinstall your eSIM.
Some networks (like Airtel or Jio in India) allow eSIM transfers directly from their apps. Others ask you to delete the eSIM from your old phone first — then request a new QR code or SM-DP+ activation code for the new phone.
If you’re using a travel eSIM (like international plans), it’s usually easier — most providers give you a dashboard where you can re-download the eSIM.
Not sure if your new phone supports eSIM? Check phone compatibility here or look it up on GSMArena for full specs.
Checklist Before You Begin
Before you try transferring your eSIM to a new Android phone, here are a few things to double-check. Missing even one step can cause the transfer to fail or the eSIM to get locked.
- Back up your important data, including contacts and messages, on your previous device before starting the transfer to avoid losing information.
- Make sure both your previous device and your new phone are connected to a stable internet connection for a smooth eSIM transfer.
- You will need to access Android settings, specifically the SIM manager, on both devices during the process.
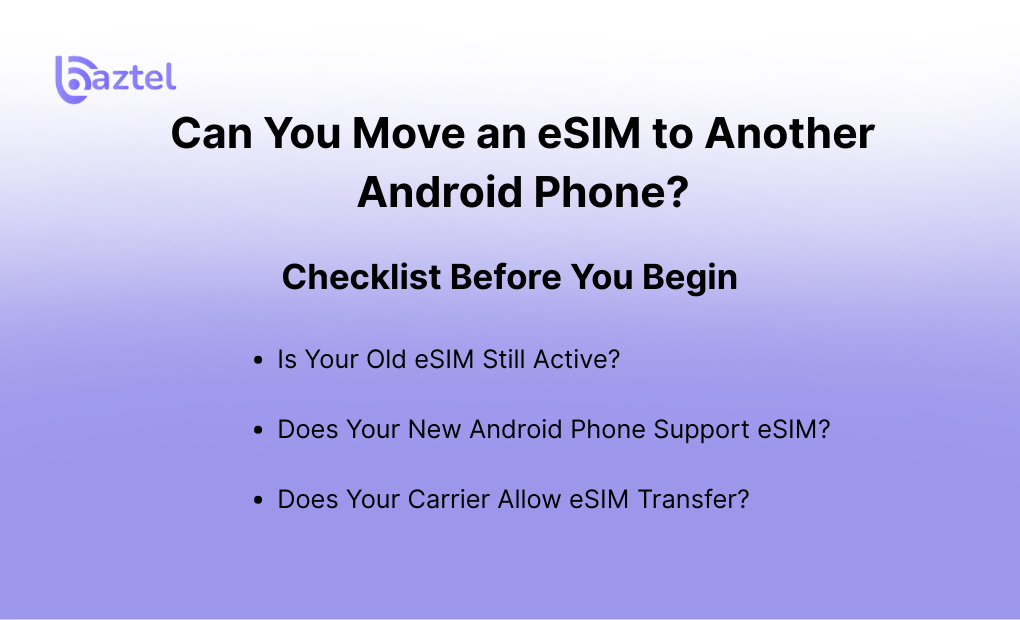
Is Your Old eSIM Still Active?
If your old phone is still using the eSIM, it might block activation on the new phone.
- On one android device (your previous device), go to Settings → Connections → SIM Manager
- Review the eSIM settings in the Android settings menu to confirm the eSIM status and compatibility.
- If the eSIM is still active, remove or disable it first.
- If it doesn’t show the delete option, just turn off mobile data for that SIM temporarily.
Some carriers don’t allow the same eSIM to be active on two devices at once
Does Your New Android Phone Support eSIM?
Not all Android phones support eSIM yet — even in 2025. Check your model by:
- Dialing *#06# and checking for an EID number
- Going to Settings → About Phone → EID
- Searching your device on GSMArena
Still unsure? Read:
Does Your Carrier Allow eSIM Transfer?
Every network is different.
- Some carriers require you to delete the old eSIM before issuing a new one. Always follow your carrier’s instructions for eSIM transfer to ensure a smooth process.
- Others allow transfers via their app (like Airtel). Contacting your service provider can clarify their eSIM support and transfer policies.
You can check:
Pro Tip: If you’re using a travel eSIM, most global providers let you re-download the eSIM from your dashboard.
Method 1 – Transfer eSIM via Carrier App
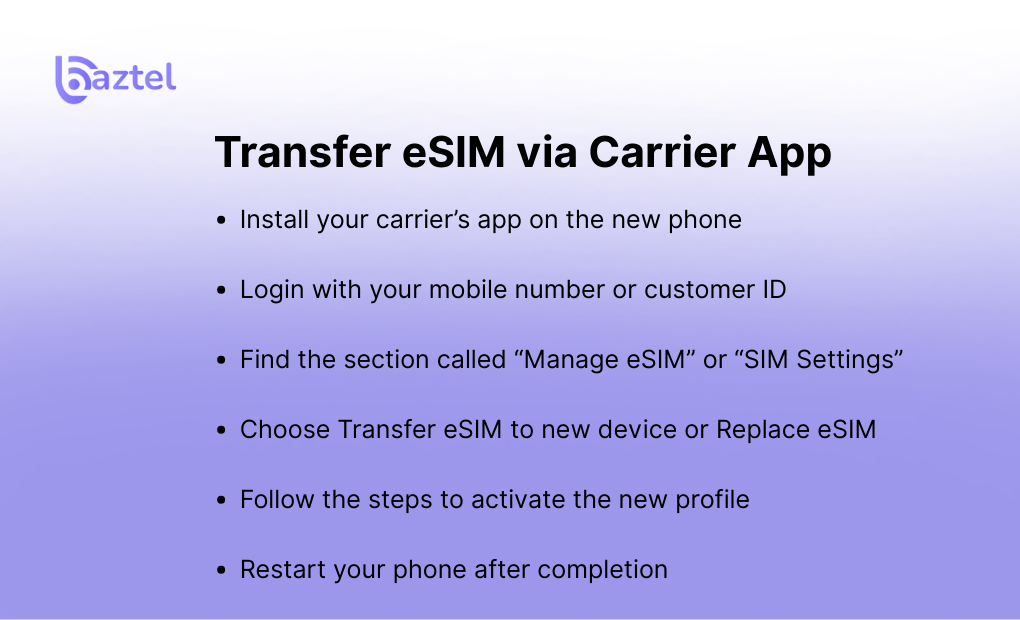
Some mobile carriers make it easy to transfer your eSIM using their official esim app. This is one way to transfer your eSIM on Android easily, especially if you’re switching to a new Android phone and still have access to your old number.
Here’s how you can do it:
- Install your carrier’s esim app on the new phone
- Login with your mobile number or customer ID
- Find the section called “Manage eSIM” or “SIM Settings”
- Choose Transfer eSIM to new device or Replace eSIM
- Follow the steps to activate the new profile using the app-based transfer method
- Restart your phone after completion
If the app-based transfer method does not work, there are alternative methods available, such as scanning a QR code or contacting your carrier for manual assistance.
Most carriers like Airtel support this — but the feature may be hidden under “SIM settings” or “Help.”
Useful links for this method:
- How to set up eSIM on iPhone and Android – if you’re switching across OS
- Discover Global eSIM Before Your Next Trip – for users planning international use (see our guide on the best time to visit London)
If this method doesn’t work, or the eSIM doesn’t show up after login, try the QR method below.
Method 2 – Transfer Using QR Code
This is one of the most common methods to transfer an eSIM from one phone to another Android device. The eSIM transfer process typically involves removing the eSIM from your old phone and installing it on your new phone using a QR code provided by your carrier. This transfer process is often called QR code installation, and it is supported by most major Android devices, including Google Pixel and Samsung Galaxy.
Here’s how to do it:
Step-by-Step
- Delete the eSIM from your old Android phone Go to: Settings → Connections → SIM Manager → Tap the eSIM → Remove
- Get your QR code
- Check your email or carrier app for the original QR
- If expired, request a new one through their website or support portal
- Scan on your new Android
- Open: Settings → Connections → SIM Manager → Add eSIM → Scan QR code
- Hold your camera steady over the code and wait for download
- Activate and restart
- Once installed, restart your phone
- Set this eSIM as default for mobile data and calls
Trouble scanning the code?
If the QR won’t scan or gives an error:
- Try on a brighter screen or clean camera lens
- Double check that Wi-Fi is ON
- Restart and try again
- If QR code installation fails, use alternative methods such as manual entry (covered in next section). If your carrier only provides activation details instead of a QR code, you can manually transfer your eSIM by entering the SM-DP+ address and activation code.
Tip: For real-world issues and fix steps, check this guide: How to Get eSIM QR Code
Also Read: Ways the Global eSIM Makes Your Travels Easier — shows how to use eSIMs across countries.
Method 3 – Transfer Using Manual Activation (SM-DP+ Code)
If your QR code doesn’t work — or your eSIM provider supports manual setup — you can activate your esim card using a SM-DP+ server address and an activation code. This manual activation is an alternative transfer method that may require you to adjust your esim settings during the process.
This method is also useful when you’ve deleted the eSIM and don’t have access to your carrier’s app. eSIM technology allows for flexible transfer processes, including manual setup, making it easier to switch devices or recover connectivity.
Step-by-Step Manual Setup
- Open your new Android phone
Go to: Settings → Connections → SIM Manager → Add eSIM → Enter Details Manually - Enter the information:
- SM-DP+ address (provided by your carrier or eSIM provider)
- Activation code (often sent via email or shown on your dashboard)
- Tap Next and let the phone download the eSIM profile
- Restart your phone and test with calls or data
Some travel eSIM platforms like Airalo or Maya Mobile also allow this manual activation if QR fails.
What is SM-DP+ and Why Does It Matters?
SM-DP+ stands for Subscription Manager Data Preparation+. It’s the system that securely pushes your eSIM plan onto your phone.
You can read more about how it works from the official GSMA specs: GSMA – eSIM Specification
Also Read: How Manual eSIM Activation Works – Real-world guide with use cases and screenshots | Interesting Facts About Albania
What to Do If eSIM Transfer Fails
Even after following the right steps, your eSIM may not activate properly. That doesn’t mean it’s broken — most issues can be fixed in minutes with a few simple checks. For a smooth eSIM transfer and smooth transition, make sure both your previous device and new device are connected to a stable internet connection before starting the eSIM transfer process.
Here are the most common problems and how to fix them:
If you reset your phone without properly removing the eSIM, the profile may become unusable and require a replacement. how to fix them:
If your eSIM is still associated with your previous device, you may encounter errors or exceed installation limits when trying to set it up on a new phone.
Activation Failed
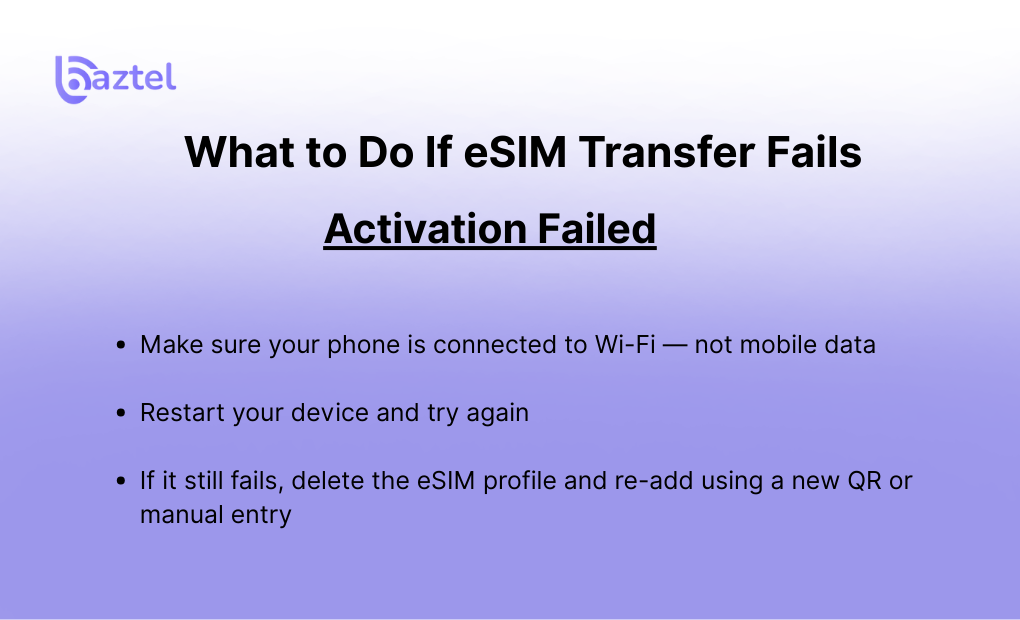
If you see “eSIM Activation Failed” or the setup is stuck:
- Make sure your phone is connected to Wi-Fi — not mobile data
- Restart your device and try again
- If it still fails, delete the eSIM profile and re-add using a new QR or manual entry
Sometimes, old or expired QR codes cause this. Learn how long QR codes stay valid
No Signal After Transfer
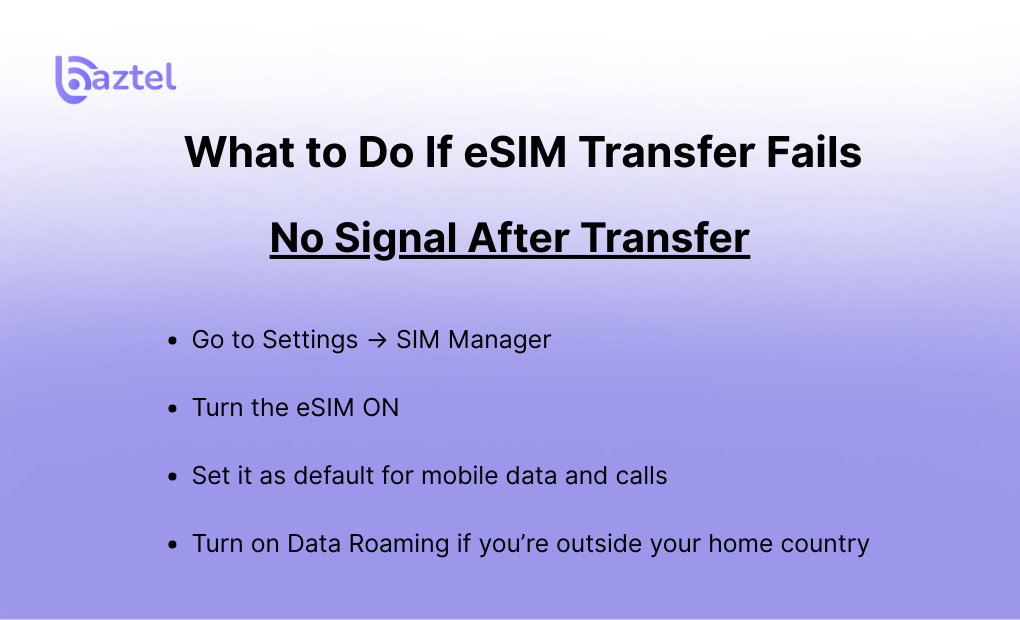
The eSIM is installed but you don’t see any network bars?
- Go to Settings → SIM Manager
- Turn the eSIM ON
- Set it as default for mobile data and calls
- Turn on Data Roaming if you’re outside your home country
For travel-specific settings, check: How to Use an eSIM for International Travel
Transfer Didn’t Complete
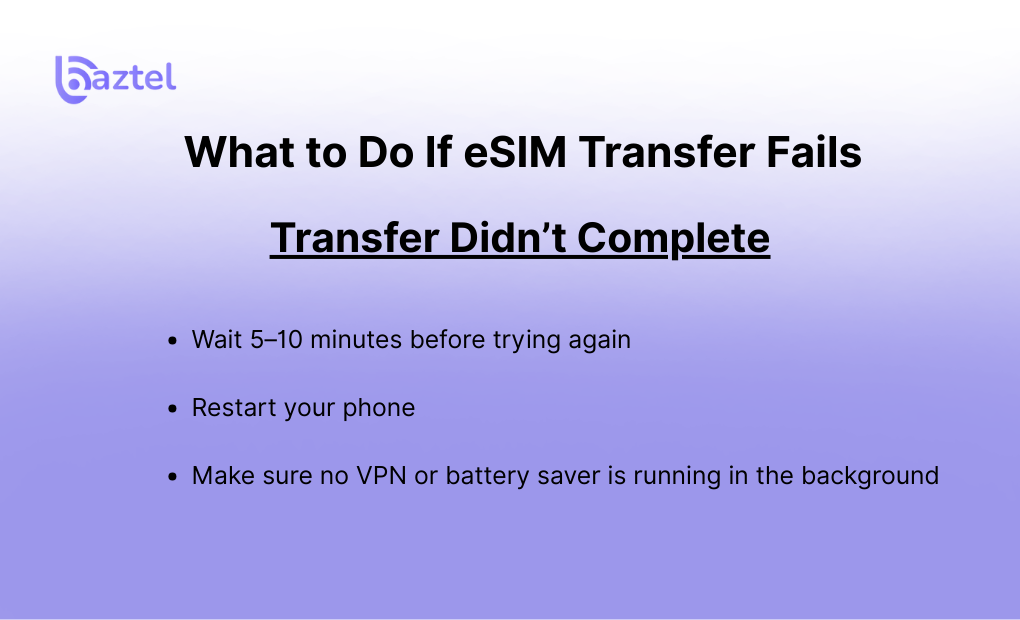
If your eSIM transfer is stuck midway or crashes the app:
- Wait 5–10 minutes before trying again
- Restart your phone
- Make sure no VPN or battery saver is running in the background
If your phone is showing “eSIM already in use,” you may need to delete the old profile and request a fresh activation code.
Understand what happens if you delete an eSIM here: What Happens If I Delete eSIM?
After the Transfer – Final Checks
Once your eSIM is installed on the new Android phone, don’t remove your physical SIM or old device just yet. Do these quick checks first to confirm the transfer worked properly.
Check Mobile Network
- Look at the signal bar at the top of your screen
- Make sure the eSIM line shows network
- No “No SIM” or “SOS” status
If there’s no signal, go to: Android Settings → Connections → SIM Manager → Toggle the eSIM ON manually. Also, review your eSIM settings to ensure the eSIM is active and properly configured.
Set eSIM as Default
To avoid confusion between dual SIMs:
- Go to: Android Settings → Mobile Network Settings
- Set eSIM as default for mobile data
- Also select it as default for calls and SMS (if needed)
Test Call, Data, and WhatsApp
Make a test call, open YouTube or a browser, and check your WhatsApp number.
- If WhatsApp still shows your old SIM, update it: WhatsApp → Settings → Account → Change Number
Double-Check Important Data
Before finishing, confirm that all important data—like contacts and messages—has transferred successfully to your new device.
You can also read: What Are the Advantages of eSIM?
It explains why switching was a good move — especially for dual-SIM, frequent travelers, or remote workers.
Final Thoughts
Now that you know how to transfer an eSIM from one Android phone to another, the process becomes less confusing. The key is to first understand that eSIMs aren’t like regular SIM cards — you can’t just move them by switching slots. eSIM technology offers a modern, convenient alternative to the traditional physical SIM card, allowing for easier switching between devices and carriers like T-Mobile, which supports eSIM data plans. You’ll either need your carrier’s help, a new QR code, or manual activation details. Always remove the old eSIM before starting on your new phone, and check if your device supports it.
Still exploring travel-ready plans or comparing options?
👉 Best eSIM Plans for Frequent Travelers👉 eSIM vs Pocket WiFi — Which one suits your next trip? If you’re heading to Indonesia, compare options with the best eSIM for Bali guide.
Switch smart, and keep this guide bookmarked — it’ll save you hours next time. Remember, iOS devices also support eSIM technology, making it possible to transfer your eSIM profile across both Android and Apple devices for even more flexibility.
FAQs: How to transfer an eSIM from one Android phone to another
1. Can I move my eSIM from one Android to another without going to a store?
Yes. If your carrier supports online eSIM management, you can transfer it through their app or by requesting a new QR code. Alternative methods include using an eSIM app for downloading or activating your eSIM, or contacting your service provider directly for assistance. No store visit is needed for most networks.
2. Will I lose anything if I delete my eSIM from the old phone?
Not really. Your eSIM holds your mobile plan, not your contacts or data. But once deleted, you’ll need a fresh activation code or QR to reuse it.
3. Can I reactivate the same eSIM on my new phone?
Sometimes yes, but not always. If your carrier supports re-download, you can reuse the same QR or activation code. If not, they’ll issue a new one. Global travel eSIMs usually allow one re-download from your dashboard.
4. Is there a faster way to set up eSIM without QR?
Yes — many carriers support app-based eSIM activation, which is quicker than scanning. You just log in to your account and follow on-screen steps.
5. Will WhatsApp or my contacts stop working after switching to eSIM?
No. Your contacts are synced to your Google account, and WhatsApp will keep working unless your number changes. You may need to update your number in WhatsApp settings once.
However, before transferring your eSIM, it’s important to back up your important data, including contacts, messages, and apps, to avoid losing anything during the process.
6. How do I know my phone is ready for eSIM?
Dial *#06# and look for the EID number. If it’s there, your android device likely supports eSIM. Before starting the transfer, it’s important to check compatibility and ensure your device has eSIM support. Alternatively, go to Settings → About Phone, or check your phone model on GSMArena to confirm eSIM support.
7. What’s better — eSIM or physical SIM for international travel?
If you travel often, eSIM technology is easier to manage compared to a physical SIM card. With eSIM technology, you can switch plans or carriers without physically swapping cards, and activate data before landing. Unlike a physical SIM card, which you need to insert and remove, eSIMs offer more convenience and flexibility for travelers. However, keep in mind that most travel eSIMs are one-time use, so you may need to purchase a new eSIM for each trip or when switching to a new device.

Blog Author
Peter
Peter started BazTel.co to make mobile internet easier for travellers. He noticed how tough it was to find good network options while visiting new countries. That’s when he built BazTel — a place where anyone can buy eSIMs online without confusion or long steps. He believes tech should be simple and useful, not complicated. When he’s free, he likes to travel, test BazTel himself, and keep improving it based on real user problems.