Botswana
 Zambia
 Congo
Congo Colombia
 China mainland
 Chile
Chile Chad
Chad Central African Republic
 Canada
 Cameroon
 Cambodia
 Burkina Faso
 Bulgaria
 Brunei Darussalam
 Brazil
 Aland Islands
 Bosnia and Herzegovina
 Bolivia
 Belgium
 Belarus
 Bangladesh
 Bahrain
 Azerbaijan
 Austria
 Australia
 Armenia
 Argentina
 Algeria
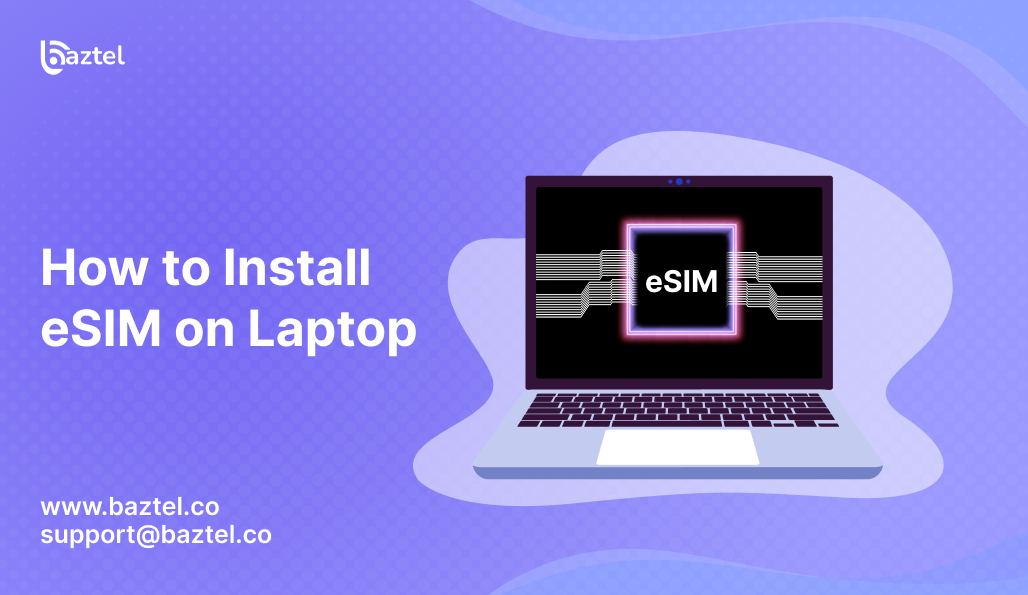
Most people think eSIMs are only for phones. But in 2025, your laptop can use one too. Whether you’re a digital nomad, a student, or someone working remotely, having mobile data on your laptop can be a game-changer. No need to rely on public Wi-Fi or mobile hotspots anymore.
eSIM technology is now built into many modern Windows laptops and MacBooks. That means you can download a data plan and get internet access — just like on your phone. But not every device supports it, and setup steps differ across systems.
If you’re new to this and want to understand what eSIM actually is, start with our quick guide on how eSIM works. Once you’re clear on that, this blog will walk you through How to Install eSIM on Laptop — from checking compatibility to activation, data plan options, troubleshooting, and safety tips.
Let’s start with the basics.
Can You Really Use eSIM on a Laptop in 2025?
Yes, you absolutely can. Many new laptops now come with built-in eSIM support. Just like your phone, these devices allow you to install a mobile data plan without needing a physical SIM slot. This means you can stay online even when there’s no Wi-Fi — at airports, hotels, or while working from your car.
Big brands like Microsoft, Lenovo, HP, and Apple have already added eSIM support to selected models. But you won’t find it in every laptop yet. Some have it hidden in advanced settings. Others may support it but only after a software update.
If you’re using your laptop for remote work, digital nomad travel, or need uninterrupted internet access on the go, it’s worth checking if your device is compatible. You can also see our complete eSIM compatibility list to find supported models for 2025.
Next, let’s check How to Install eSIM on Laptop if your current laptop has eSIM support or not.
Which Laptops Support eSIM?
Not every laptop in the market has eSIM built-in. But some do. Brands like Microsoft Surface, Lenovo ThinkPad X1, and HP Elite Dragonfly have models with eSIM support. In Apple’s world, only certain MacBooks with Apple Silicon chips may offer indirect support via Continuity.
You’ll mostly find eSIM in premium business laptops, especially those meant for enterprise use. These devices are designed for users who travel often and need data without relying on public Wi-Fi. Some Chromebooks also support eSIM, but only a few.
If you’re unsure whether your model has it, don’t worry — the next section shows How to Install eSIM on Laptop step by step.
How to Check eSIM Support on Your Device
Finding out if your laptop supports eSIM is quite simple. On Windows laptops, go to Settings → Network & Internet → Cellular. If there’s an option to add a profile or manage eSIMs, your laptop supports it. Some models also mention “eSIM” or “LTE” in the system specs under device manager or network adapters.
For MacBooks, the process isn’t direct. Apple laptops don’t have eSIM by default, but if you’re using an iPhone or iPad nearby, Apple Continuity may offer similar benefits. You can check Apple’s official support page to see if your model supports data sharing with other Apple devices.
Still not sure? Search your laptop model online with “eSIM supported?” or check the brand’s website.
How to Install eSIM on Laptop on a Windows
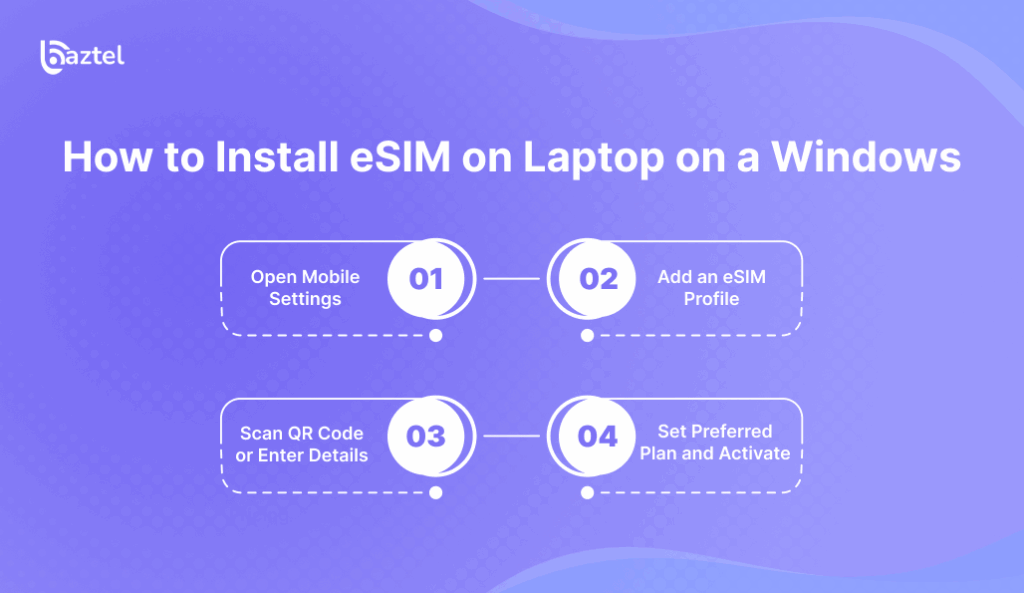
If your Windows laptop supports eSIM, setting it up doesn’t take long. You won’t need any extra hardware or tech help. Just a working internet connection and the eSIM details from your provider.
Start by opening your Settings and going to the Cellular section. This is where your laptop manages mobile networks. Here, you’ll see an option to add an eSIM plan. Depending on your provider, you’ll either scan a QR code or manually type in the activation details. Once done, you can set it as your primary connection or use it as backup data while travelling.
This feature is especially useful for digital nomads, remote workers, or students who move around often. If you’re using a Baztel eSIM, setup is even quicker — most plans come with auto-activation and 24×7 support for laptop usage too.
Step 1 – Open Mobile Settings
Just like you’d start on a smartphone, begin by opening the mobile or cellular settings on your laptop. In a Windows laptop, go to Settings → Network & Internet → Cellular. If your laptop supports eSIM, you’ll see an option to add a profile. On macOS (if supported), eSIM settings may appear under Network in the System Settings. If this feels new to you, check out our detailed guide to setting up eSIM on Android and iPhone to understand the basics before trying it on your laptop.
Step 2 – Add an eSIM Profile
Once you’re inside the cellular settings, look for the ‘Add a profile’ or ‘Manage eSIM profiles’ option. This is where your journey with digital SIM begins. On Windows laptops, it prompts you to scan a QR code or enter activation details manually. If you’re not seeing this option, your laptop may not support eSIM — check again with our full eSIM compatibility list to be sure. For MacBook users, this step depends on your chip version — Apple’s help guide explains which devices support cellular features.
Step 3 – Scan QR Code or Enter Details
You’ll now need to scan the eSIM QR code provided by your eSIM provider. Most platforms like Baztel email this immediately after purchase. Open your laptop’s camera or manually input the SM-DP+ address and activation code if required. If the QR doesn’t scan, don’t panic. We’ve covered common eSIM QR code issues and fixes in this detailed blog. Always save a copy of the activation info, especially while travelling — you never know when you’ll need to reinstall it.
Step 4 – Set Preferred Plan and Activate
Once your eSIM details are added, your laptop may show multiple plans if you’ve used eSIM before. Select the one you just installed and mark it as your preferred profile for data. Hit ‘Connect’ or ‘Activate’ to finish. That’s it — your eSIM should now be live. If you’re using Baztel or another travel eSIM provider, you’ll usually see a confirmation pop-up. Need to switch plans often while traveling? Our guide on changing eSIM plans helps you manage everything without reinstalling new QR codes again and again. It’s that simple.
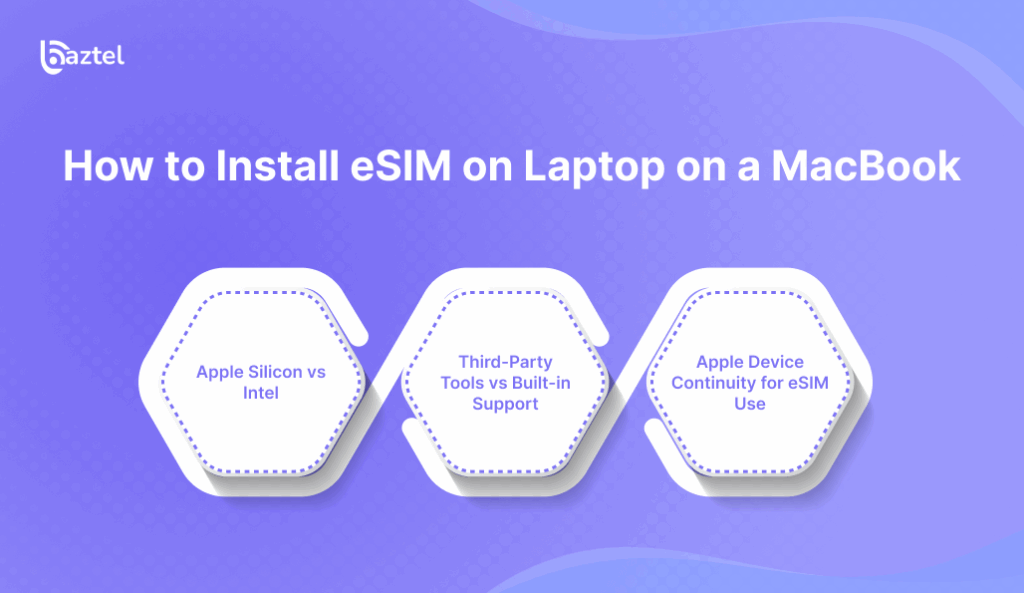
How to Install eSIM on Laptop on a MacBook
You don’t need to be tech-savvy to use eSIM on a MacBook. But there’s a catch — not all MacBooks are ready for it yet. Only some models support eSIM out of the box. And even then, setup steps differ depending on whether you’re using an Apple Silicon (M1/M2/M3) or an older Intel-based machine. This section breaks it down in simple steps. We’ll also explain where to find global eSIM plans for MacBooks, and what to do if things don’t work right away. By the end, you’ll know how to use a travel eSIM just like you do on your phone — no cables, no extra device.
Want to check if your MacBook supports eSIM first? Use our device compatibility tool to confirm in seconds.
Apple Silicon vs Intel – What’s Supported?
Not every MacBook comes with eSIM support, even in 2025. Most newer models with Apple Silicon chips (like M1, M2, or M3) have better chances of supporting cellular features. But older Intel-based MacBooks usually lack built-in eSIM capability — unless you use a third-party workaround.
To be clear, eSIM on MacBook is not yet available as a full feature like on iPhones. Some cellular-ready versions of iPad Pro and MacBook Air M2/M3 can connect using shared data plans, but it still depends on your carrier. And even then, you may need to log in through iCloud Continuity or use a personal hotspot setup.
If your MacBook doesn’t support eSIM yet, don’t worry. You can still get a local eSIM card for international travel and share its data with your laptop. It’s a simple fix that works in most countries.
Third-Party Tools vs Built-in Support
If your laptop doesn’t support eSIM out of the box, don’t lose hope. In 2025, many travelers will still rely on third-party tools like USB eSIM dongles, LTE-enabled hotspots, or wireless data cards that can add eSIM-like functionality to any Windows or macOS device. These tools act like a bridge — allowing your laptop to go online using a digital plan, even if it doesn’t have a built-in eSIM chip.
On the flip side, laptops with native eSIM support (like some Surface Pro models or business-grade Lenovo ThinkPads) make it much easier. You can directly scan a QR code or load an eSIM profile via settings — just like you would on a phone. It’s faster, more secure, and doesn’t need any extra gadgets.
Not sure which method is better for your trip? This eSIM for international travel guide breaks down all your options. For advanced users, sites like Windows Central also list compatible hardware and manual configuration tips.
Apple Device Continuity for eSIM Use
Apple fans using MacBooks in 2025 have one big advantage: continuity. If your iPhone already has an eSIM, you can share its data plan with your MacBook through Instant Hotspot or iCloud syncing. No need to install a separate eSIM if both devices use the same Apple ID and are close to each other.
But that doesn’t mean your MacBook supports standalone eSIM plans. Only newer models with Apple Silicon chips are expected to add full eSIM functionality in the coming updates. So, if you’re relying on your MacBook for travel data, it’s still better to buy a proper eSIM plan meant for laptops.
Confused between phone eSIM vs laptop eSIM? This blog on setting up eSIM for international travel breaks it down clearly.
How to Buy an eSIM for Laptop Usage
Buying an eSIM for your laptop is not as simple as picking a mobile plan. Laptops need data-only eSIM plans that support large downloads, video meetings, and multiple device usage—especially if you’re working while traveling.
Start by checking if your laptop model supports eSIM activation. Windows laptops usually let you scan a QR code from your provider, while Apple Silicon MacBooks are slowly rolling out native support. If your device is compatible, the next step is to find a reliable provider that offers global or country-specific laptop eSIMs.
You can explore Baztel’s eSIM plans if you want international coverage with flexible top-up options. Baztel also supports local plans in countries like Canada, Australia, UAE, and more.
Things to Look for in a Laptop Data Plan
Not all eSIM data plans are made for laptops. Mobile plans often come with voice, SMS, or limited hotspot use. But for laptops, you’ll need a data-only plan that prioritizes speed, long sessions, and roaming flexibility.
Start by checking if the plan allows hotspot sharing—many users connect phones or tablets through the laptop. Also, look at the fair usage limit. Plans with small daily caps won’t support video meetings, large downloads, or streaming. If you’re a traveler, avoid plans that slow down after just 1GB.
Choose a provider with global reach. For example, Baztel offers international eSIMs with high-speed limits and country-specific plans that work across multiple regions.
Lastly, always read the refund or activation failure policy. Laptop eSIMs can face setup errors. A clear return policy saves time and frustration.
Can You Use a Phone eSIM on a Laptop?
Yes and no. Technically, you can try using a phone eSIM on a laptop, but most of the time, it won’t work as expected. That’s because eSIMs are configured based on the device type. A mobile eSIM plan is usually optimized for smartphones—calls, texts, and app-specific bandwidth priorities. Laptops, however, are treated as data-only devices and often need a separate plan configuration.
Some users ask, “Can’t I just transfer the QR code from my phone to laptop?” But it’s not that simple. eSIMs are locked to one device profile once activated. Even if you use the same provider, you’ll need a fresh QR code issued for your laptop.
Providers like Baztel clearly separate travel eSIMs by device type. This ensures proper activation and smooth connectivity.
Also, check your operating system version. Newer Windows 11 and macOS Ventura versions handle device-specific eSIMs better. For those using enterprise plans, your IT team might need to configure an MDM profile before any eSIM shows up on a corporate laptop.
Best option? Always buy an eSIM made for laptops to avoid wasted time or compatibility issues.
Where to Get Global or Local eSIM Plans
If you’re planning to install an eSIM on your laptop, the first thing you’ll need is a data plan that actually works with your device. Now the question is—should you buy a global eSIM or stick to a local one?
For short international trips, global eSIM providers like Baztel are ideal. They offer cross-country data coverage, quick QR activations, and flexible validity. These plans work well if you’re hopping between cities or using public Wi-Fi networks in airports, hotels, or coworking cafes.
But if you’re staying longer in one country, go for a local eSIM plan from providers listed on marketplaces like GSMArena, or directly on telecom websites. These often provide more data for less money, but might require KYC or local payment options.
Also, look for plans that explicitly mention laptop compatibility. Some providers offer plans for tablets or IoT devices, which may also work on laptops with built-in eSIM modules.
Before purchasing, revisit your laptop’s compatibility settings. You can cross-check supported carriers on our internal blog Is My Phone eSIM Compatible?, as the process is nearly the same for laptops.
Best tip? Always pick a provider that gives you manual installation options (like SM-DP+ address) in case your laptop doesn’t support QR scanning.
Troubleshooting eSIM Activation on Laptops
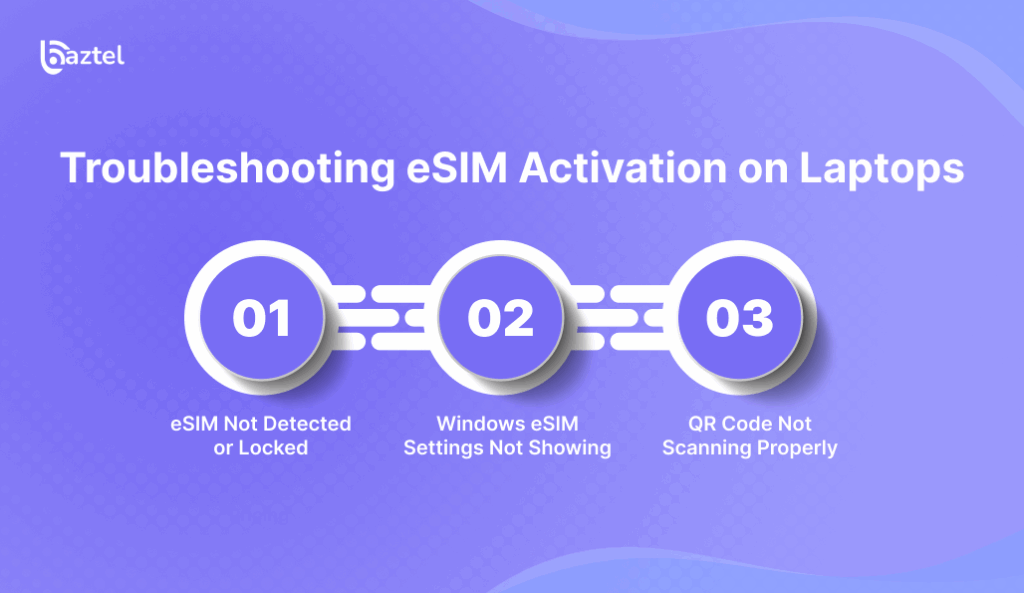
Sometimes, even when everything looks correct, your eSIM just doesn’t work on your laptop. You’ve scanned the QR, entered the activation details, and still — no internet. Don’t panic. eSIM issues on laptops are common and usually easy to fix. The trick is knowing where to look.
In this section, we’ll walk through common errors like when the eSIM doesn’t show up, your QR code isn’t recognized, or Windows refuses to load the mobile data settings. Most of these problems happen because of outdated software, unsupported regions, or eSIM profiles that aren’t designed for laptops.
We’ll also share easy fixes, like switching to manual setup or updating your laptop firmware. And if you’re still stuck, you can check our full eSIM Troubleshooting Guide for more solutions that work across devices.
Let’s start with the most frequent issues:
eSIM Not Detected or Locked
If your laptop says “No SIM found” or “eSIM not detected,” the first thing to check is whether your device even supports eSIM. Not all laptops with mobile connectivity are actually eSIM-ready.
Try opening your Windows Settings > Network & Internet > Cellular and see if the eSIM section appears. If not, your firmware may need an update. You can also run a quick check through your device manager to see if the eSIM module is being blocked by your system or BIOS.
Another reason could be that the eSIM is locked to a specific provider — which happens if you’re using corporate laptops with IT restrictions. In that case, ask your admin to unlock it or switch to a different device.
You can learn more about device compatibility and eSIM modules in our blog: eSIM Compatibility List for 2025.
Windows eSIM Settings Not Showing
If you can’t find the eSIM option on your Windows laptop, don’t assume it’s broken. This issue is mostly tied to your system settings or outdated OS version. Start by checking your Windows version — eSIM settings are only available on Windows 10 (version 1703 or later) and all versions of Windows 11.
To check, go to Settings > About > Windows specifications. If your version is too old, update it.
Still can’t see eSIM settings? Open the Device Manager, then look under “Network adapters” and “Modem” to see if your eSIM hardware is listed. If not, you may need to reinstall drivers or enable cellular support in BIOS.
Also, avoid using VPNs or enterprise profiles during setup — these can block access to mobile network settings.
QR Code Not Scanning Properly
This is one of the most common eSIM errors on laptops — you try to scan the QR code, and nothing happens. First, make sure your laptop’s camera is working. Try opening your camera app and check if it’s clear. If the lens is dirty or scratched, clean it and try again.
Next, make sure the QR code is not blurry. Don’t zoom in too much or show it from your phone screen at a sharp angle. Bright lighting and a stable hand really help.
Also, your laptop should support eSIM QR format. If you’re using a PDF or screenshot, open it in full screen and scan again. Still not working? You can always enter the SM-DP+ address and activation code manually. Most providers like Baztel and Airalo give these details along with the QR.
Still stuck? Try restarting your laptop, switch Wi-Fi off, and then retry the scan under mobile network settings.
Can You Switch eSIM Plans on Laptops?
Yes, you can. Just like phones, modern laptops with eSIM support let you switch data plans — whether you’re hopping between countries or just want a better deal.
Say you’re using a Windows laptop with a local eSIM for work in India. Now, you’re flying to Germany. You don’t need to remove anything or wait in queues. You can simply buy a new eSIM for Germany from providers like Baztel or Airalo, scan the QR, and switch profiles inside your laptop settings. Most laptops support multiple eSIM profiles, though only one stays active at a time.
Switching plans usually doesn’t cost extra — unless your old plan had contract terms. Always check the validity and expiry date of your current plan before deleting or replacing it. If your plan allows renewal or recharge, you can even pause and come back to it later.
Remember to choose a provider that offers data plans optimized for laptops — many phone-based plans may throttle speeds or block tethering. It’s better to pick a travel eSIM specifically for devices with larger data needs.
Let’s go deeper into how to Install eSIM on laptop, how you can manage profiles and delete or replace eSIMs on your device.
Managing Multiple Profiles
Modern laptops that support eSIM can store more than one profile — which means you don’t need to delete your old plan every time you travel. Let’s say you’re a digital nomad moving between Spain, UAE, and Singapore. You can store eSIMs for all three countries and just switch between them as needed.
On Windows, go to Settings > Network & Internet > Cellular. Under “Manage eSIM profiles,” you’ll see all your downloaded plans. You can give each one a name like “Spain Work Trip” or “UAE Personal” to keep things clear. Then, just select the one you want and hit Activate. Others will stay stored until you need them again.
MacBooks with built-in eSIM (especially M-series chips) offer similar toggling via System Settings > Network. And with Apple’s Device Continuity, you can sync mobile plans between iPhone and Mac — useful if you’ve already set up an eSIM on your iPhone and want to mirror it on your Mac.
Some providers like Baztel let you manage your eSIMs through their dashboard, which makes switching even faster. Just remember: only one profile stays active at a time. So plan ahead if you’re working remotely or juggling work and personal data plans on one device.
Deleting or Replacing eSIM Plans
If you’re no longer using a specific eSIM — maybe your Thailand trip is over or your USA plan has expired — you can remove it safely without affecting other saved profiles.
On Windows laptops, head to Settings > Network & Internet > Cellular, select the plan you want to remove, and click Delete. You’ll be asked to confirm. Once deleted, that eSIM slot becomes free again.
For MacBooks, go to System Settings > Network, choose the profile, and hit the minus (-) button. Make sure you’ve disconnected before deleting, or you might see a temporary “Network Error” message.
If you plan to replace the eSIM — say switching from a short-term UK plan to a long-term Germany eSIM — the process is the same: remove the old, scan the new QR code, and assign it as the default for mobile data.
Some users prefer keeping expired eSIMs just for quick reactivation later. That’s fine too — especially if you revisit places like Canada or Australia regularly. Just don’t activate more than one at a time unless your device specifically supports multiple active eSIMs.
Is It Safe to Use eSIM on Laptops for Work or Travel?
Using eSIM on a laptop isn’t just about convenience. For many travelers and remote workers, it’s also about staying safe online. So, how secure is this tech really?
First — yes, eSIM is secure. It’s built with strong encryption, just like your mobile eSIM. Your data profile is stored digitally and locked to your device’s hardware. That means even if someone steals your MacBook or Windows laptop, they can’t just pop out a SIM and misuse your plan.
Also, there’s less risk of losing the SIM physically — which often happens when swapping plans between trips. With eSIM, everything stays inside. Just lock your device, and you’re good.
If you’re using an eSIM while traveling to Spain, Italy, or France, you’ll often connect to premium local networks. This gives you better privacy and speeds than public Wi-Fi, which can be risky for business or banking access.
One thing to remember: Always set up a device PIN and use built-in encryption (like BitLocker on Windows or FileVault on Mac). These protect not just your eSIM, but all the files on your system.
For added safety, some users get country-specific plans like UAE or Turkey to keep work data on a separate profile, especially while traveling through regions with heavy internet monitoring.
In short — eSIMs are not only travel-friendly, they’re also more secure than juggling physical SIM cards in 2025.
Conclusion
Laptops are no longer just for spreadsheets or Netflix — they’re now your travel hubs. Whether you’re working remotely in a café in Germany or attending meetings on the go in Singapore, having eSIM built into your device can make life much easier.
From checking compatibility to installing eSIMs on Windows or Mac, the process isn’t as complicated as it sounds. You don’t need a tech degree — just the right steps, a QR code, and maybe a few minutes to activate your data plan.
For most users, especially travelers, remote workers, and digital nomads, this guide answers the most common doubts around using an eSIM for international travel. If you’re someone who travels frequently or wants to stay connected without juggling hotspots and dongles, installing an eSIM on your laptop is a smart move.
And if you’re still deciding between global or local eSIMs, explore our best international eSIM plans for laptops and tablets — tailored for modern travelers in 2025.
Still have questions? The FAQ below might help.
FAQs
1. Can I use the same eSIM on both phone and laptop?
Not always. Some eSIM plans are device-specific. Before buying, check if your plan supports laptop usage or allows device transfer. For global use, explore eSIM plans that support multiple devices.
2. How do I know if my laptop supports eSIM?
Go to your device settings and search for “Mobile” or “Cellular.” If there’s an option to add a profile or manage eSIMs, your device likely supports it. You can also check our guide on eSIM compatibility.
3. Will eSIM work on all versions of Windows or macOS?
No. Windows 10 and 11 have eSIM support on select models. MacBook support is still limited and depends on model and chip.
4. Can I delete my eSIM plan from my laptop?
Yes. You can manage, delete, or replace eSIM plans from your network settings. Just make sure to save your plan details in case you want to re-install it.
5. Is it safe to use public WiFi with an eSIM plan?
Using mobile data via eSIM is often safer than public WiFi. It creates a direct connection to your network provider. Still, always use antivirus and basic digital hygiene while working remotely.

Blog Author
Peter
Peter started BazTel.co to make mobile internet easier for travellers. He noticed how tough it was to find good network options while visiting new countries. That’s when he built BazTel — a place where anyone can buy eSIMs online without confusion or long steps. He believes tech should be simple and useful, not complicated. When he’s free, he likes to travel, test BazTel himself, and keep improving it based on real user problems.