Botswana
 Zambia
 Congo
Congo Colombia
 China mainland
 Chile
Chile Chad
Chad Central African Republic
 Canada
 Cameroon
 Cambodia
 Burkina Faso
 Bulgaria
 Brunei Darussalam
 Brazil
 Aland Islands
 Bosnia and Herzegovina
 Bolivia
 Belgium
 Belarus
 Bangladesh
 Bahrain
 Azerbaijan
 Austria
 Australia
 Armenia
 Argentina
 Algeria
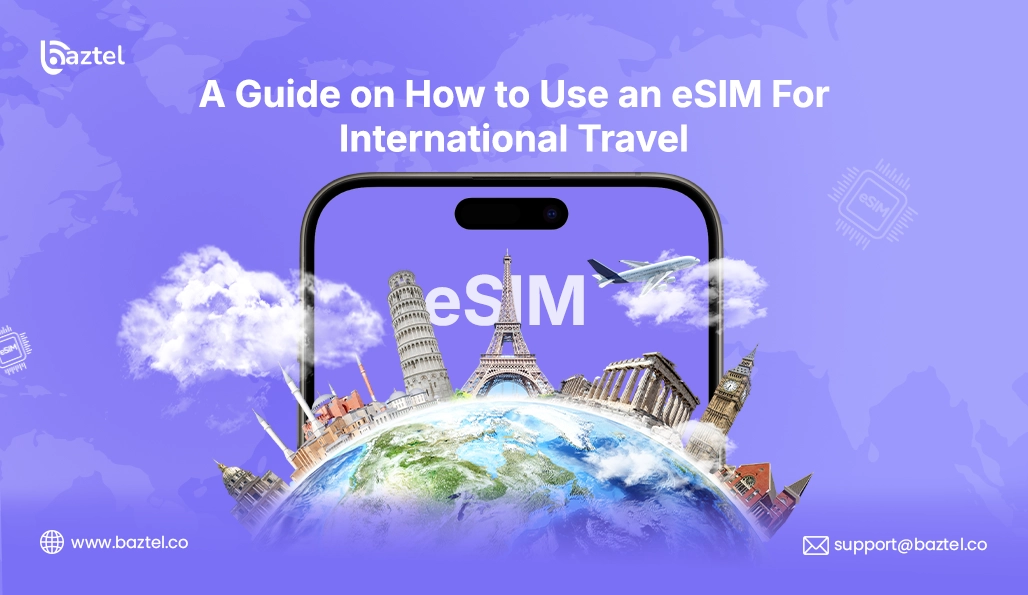
Scrambling at the airport to find a local SIM? Trying to decode roaming plans with hidden charges? We’ve all been there. That’s exactly why more and more Indian travelers are moving to eSIMs. Unlike physical SIM cards, an eSIM for international travel is built right into your phone. No more swapping tiny chips or worrying about losing your Indian SIM abroad. You just scan a QR code, and boom — you’re connected. For frequent flyers, this small switch brings big comfort. You save time, avoid roaming shock, and get access to reliable networks wherever you land. Whether you’re off for a quick business trip or a Europe tour, using an eSIM card for international travel gives you a clean, stress-free experience. In this blog, we’ll explain how to pick the best eSIM for international travel, how to activate it, and what to expect during your trip. It’s beginner-friendly, with practical steps — Just like you’d explain it to a mate over coffee.
How an eSIM for International Travel Works
First things first — what exactly is an eSIM? Think of it as a digital version of your physical SIM card. But instead of inserting it into your phone, you just download it. That’s it. The setup takes less time than making a cup of instant noodles. When you buy an eSIM for international travel, your mobile operator gives you a QR code. You scan it in your phone’s settings, and it adds a new mobile profile — just like adding a contact. Once it’s active, your phone connects to a local network in the country you’re visiting. Now the best part — you don’t need to visit a store, fiddle with tiny SIM trays, or worry about losing your existing SIM. Everything happens digitally. You get your QR code, scan it once, and your travel network is ready. It’s a simple process that saves you time and removes one more thing from your travel stress list.
Here’s how it works in real life:
- Before your trip – Pick the country or region, and buy an eSIM card for international travel from a trusted provider online. You’ll get a QR instantly on email or WhatsApp.
- At the airport or once you land – Turn off your Indian SIM (to avoid roaming), and activate the eSIM from your phone settings. Your phone connects to the local network automatically.
- During your trip – Enjoy smooth internet, calls (if included), and app usage like a local — without spending on costly international roaming.
All major smartphones now support eSIMs — especially iPhones (XR and above), Pixel, Samsung (S20 and above), and many newer models. You don’t need to unlock your phone or change any hardware. Using an eSIM for international travel is perfect for solo trips, family holidays, or work tours. It’s one less thing to worry about — and one more smart travel habit to pick up.
Choosing the Best eSIM for International Travel: Key Factors to Compare
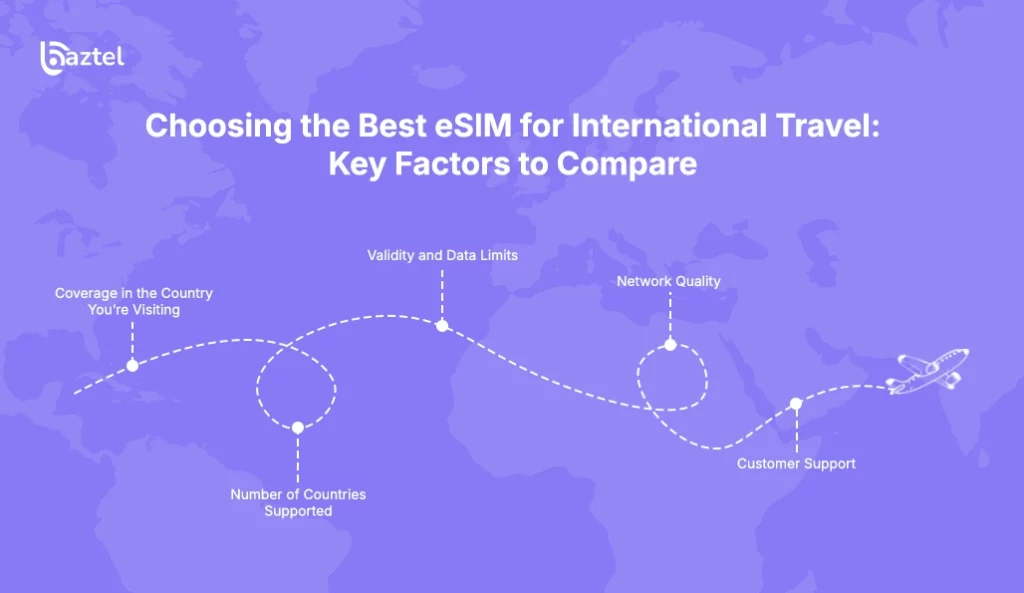
Not all eSIMs are the same. Some offer cheap rates but poor networks. Others give great speed but only in a few countries. So how do you find the best eSIM for international travel that actually works for you? Here’s what to look for:
- Coverage in the Country You’re Visiting
The biggest mistake people make? Buying a global plan when they’re only visiting one or two countries. It sounds smart, but often global plans come with limited speeds or short validity. If you’re flying to a single country (say, Thailand or UAE), it’s better to buy an eSIM for international travel that’s specific to that country. It’ll give you better speed, more data, and lower rates.
- Number of Countries Supported
If you’re doing multi-country travel — like Europe or Southeast Asia — go for a regional plan. Some eSIM cards for travelers support 30+ countries under one plan. That way, you won’t need to keep switching settings or buying new ones after every border crossing.
- Validity and Data Limits
Always check how many days the plan lasts and how much data you’re getting. Some plans expire in 7 days, others last 30. Some give unlimited data (but slow speeds), while others give fixed GBs at full speed. Choose based on your usage — if you just use WhatsApp and Maps, 3–5 GB might be enough. But if you stream videos or use Zoom, go for 10 GB or more.
- Network Quality
Look for eSIMs that connect to top-tier networks in that country. A good provider usually mentions the local telecom they tie up with — like AT&T, Orange, or Vodafone. Don’t just go for the cheapest option. Saving a few dollars isn’t worth the headache of slow internet.
- Customer Support
What if the QR doesn’t work or your plan doesn’t activate? Always check if the provider has proper support — either chat, email, or even WhatsApp. You’re in a foreign country. Help should be just a message away. When you compare these points side by side, you’ll be able to pick the eSIM for international travel based on real needs — not just price tags.
Pro tip — always bookmark the activation guide and save the QR email in multiple places like your inbox, gallery, or cloud notes. Imagine reaching the airport and not being able to access your code due to no internet or a last-minute phone glitch. Having quick access to your eSIM details can save you from last-minute panic and delays in getting connected.
Where to Buy eSIM for International Travel: Trusted Marketplaces & Providers
Now that you know what to look for, the next big question is — where should you buy eSIM for international travel? There are a few reliable ways travelers usually get their eSIMs. Let’s break them down:
- Direct from Your Primary Mobile Operator
Some mobile service providers offer international roaming eSIMs. These may seem like an easy choice, but they often come with higher costs, limited flexibility, and are usually linked to your existing number. Incoming messages or calls might also trigger roaming charges, which can quickly add up. If you’re looking for a flexible and affordable data option, it’s better to go with an independent eSIM provider.
- Global eSIM Marketplaces (Most Popular Choice)
This is the option most travelers prefer today. These platforms let you pick a destination, compare plans, and get instant delivery of your global eSIM card for international travel via email or app. Some well-known marketplaces include:
- Airalo
- BazTel
- Nomad
- Holafly
- GigSky
These providers offer a wide range of plans — from single-country to regional and even global coverage. Whether you’re visiting one destination or hopping across borders, you can find the top eSIM for international travel based on your needs and budget. Most of them also offer top-up support, user guides, and 24/7 chat.
- Travel Apps That Bundle eSIMs
Some travel booking apps now include eSIMs with their hotel or flight packages. While it feels convenient, the prices tend to be higher, and you might not have the freedom to pick your preferred network or plan. It’s fine for first-time users, but frequent travelers usually go for more flexible options.
Quick Tips Before You Buy:
- Make sure your device supports eSIMs (check your phone settings or the brand’s website).
- Only purchase from verified or reviewed platforms — avoid unknown websites.
- Save your QR code in at least two places (email + gallery) in case one doesn’t open.
- Look for plans that allow top-ups, so you’re not stuck without data later.
To sum it up — when you buy eSIM for international travel, go with a trusted, flexible, and reviewed provider. It makes your trip smoother and gives you one less thing to worry about.
Using One eSIM Across Multiple Countries: Data-Saving Tips
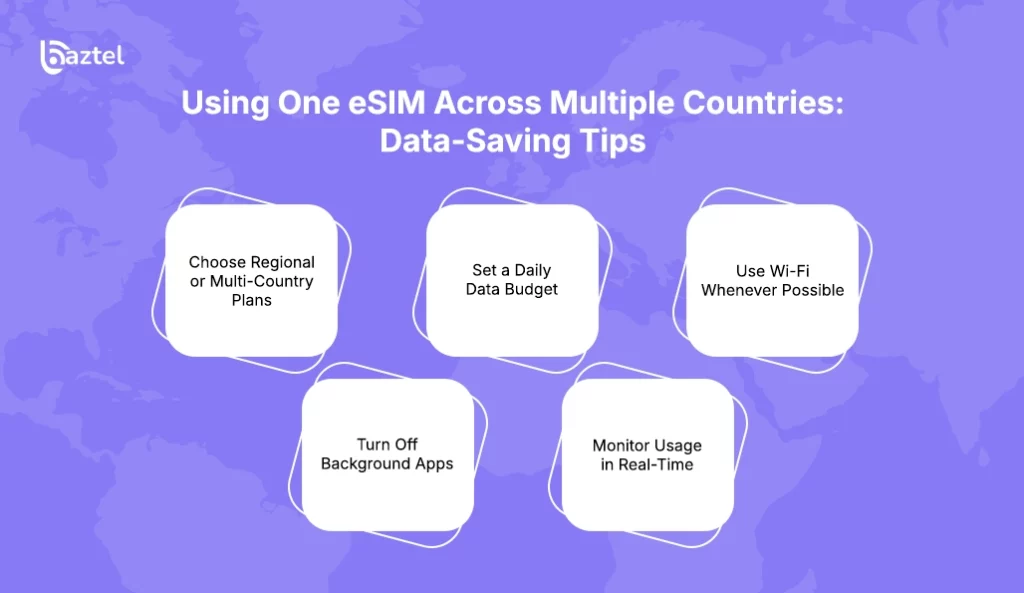
One of the biggest reasons people now prefer using an eSIM for international travel is because of the flexibility it offers — especially when you’re visiting multiple countries. You don’t need to carry a bunch of physical SIMs or run around looking for a local store every time you cross a border. But to make the most out of one eSIM across countries, it’s important to plan your usage wisely and avoid unnecessary data loss.
Choose Regional or Multi-Country Plans
If you’re visiting more than one country, look for regional plans when you buy eSIM for international travel. These plans are made for cross-border travel — covering multiple countries under a single eSIM. No need to install a new QR code every time you enter a new country. Before purchasing, always check the list of supported countries. Even if a plan says “Europe” or “Asia”, confirm that your destinations are included.
Set a Daily Data Budget
When you’re using mobile data in a new country, it’s easy to forget how quickly it gets consumed. Social media, background apps, auto-updates — all of them eat into your data silently. That’s why it’s smart to set a daily data limit for yourself. If your plan gives you 5 GB for 10 days, divide it across the trip and stick to that limit. This way, you’ll avoid situations where you run out of data mid-journey and have to stop everything to recharge.
Use Wi-Fi Whenever Possible
Yes, you’ve paid for the eSIM plan, but that doesn’t mean you should use mobile data all the time. When you’re at hotels, airports, cafes, or public places with stable Wi-Fi, make the switch. Save your eSIM data for times when you’re truly mobile — like navigating unknown streets, booking rides, or using travel apps on the go. Many travelers end up exhausting their entire plan by watching videos or uploading photos while sitting in a hotel room with working Wi-Fi.
Turn Off Background Apps
Apps like Google Photos, Instagram, YouTube, or file-sharing tools often keep running in the background — syncing files, auto-refreshing, or preloading content. This might not be noticeable at home, but while traveling, it can silently drain your data. Take a few minutes to go into your phone’s settings and restrict background data for non-essential apps. This small habit can save you hundreds of MBs daily and make your eSIM card for international travel last longer.
Monitor Usage in Real-Time
Most eSIM providers offer dashboards or apps that show your current data usage. Keep an eye on it daily. If you’re running low, you can top up early and avoid service disruption. Using one eSIM for international travel across countries is not just possible — it’s smart and cost-effective. A little planning and awareness go a long way in avoiding network issues or unexpected expenses during your trip.
This kind of basic planning makes sure your eSIM for international travel works smoothly across countries — without unexpected breaks, slowdowns, or extra charges. A little discipline goes a long way when you’re managing travel connectivity.
Troubleshooting Common eSIM Issues on the Road
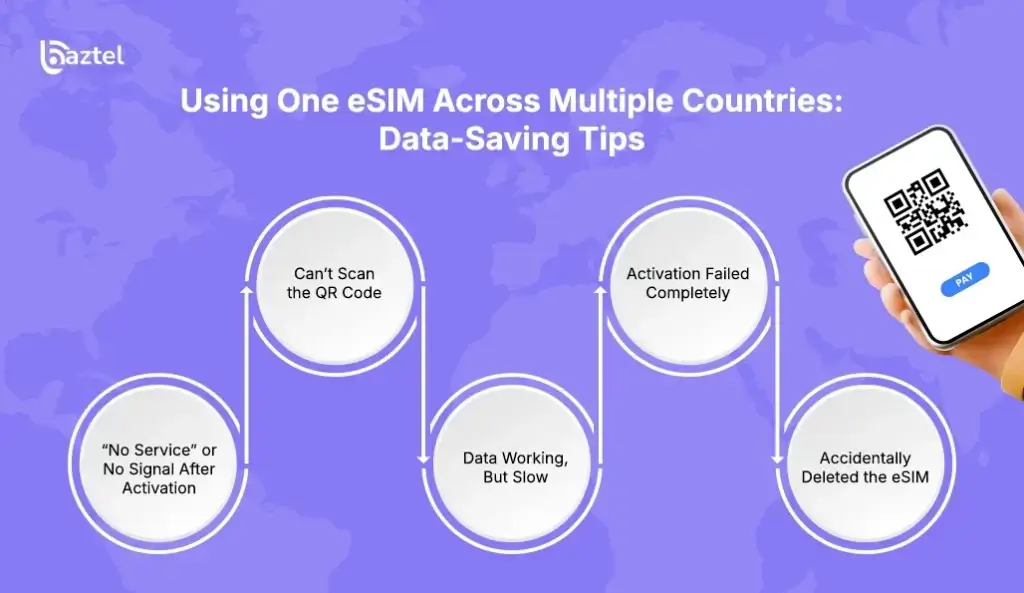
Even though using an eSIM for international travel is usually smooth, there can be a few hiccups now and then. Don’t worry — most problems have simple fixes. Here’s how to handle the common ones without panicking.
1. “No Service” or No Signal After Activation
This is one of the most common issues travelers face. You scan the QR, activate the plan, but your phone still says “No Service”. In most cases, the eSIM plan hasn’t started yet — some plans begin only from a set date or local time. Another reason could be that your phone is still using your main SIM for data, or roaming is off for the eSIM. The fix is simple: go to SIM settings, turn on the eSIM, set it as the default for data, and enable data roaming. Restart the phone once to refresh everything. You should be good to go.
2. Can’t Scan the QR Code
Sometimes the QR code just refuses to scan — maybe the image is blurry, your screen brightness is too low, or the camera isn’t focusing properly. If this happens, don’t panic. Most eSIM providers also offer a manual setup option with a code you can type in. Open your email on another device and zoom in, or forward it to someone who can show it to you on their phone — whatever works best. Once the code is entered or scanned clearly, your setup continues smoothly.
3. Data Working, But Slow
You might notice that even though your eSIM is active, the internet feels unusually slow. This can happen if your plan has a daily cap — after a certain limit, speed drops. Or maybe the local network you’re connected to isn’t very strong in that area. To fix this, check your provider’s dashboard for usage info. If you’re within limits, try switching to another supported network (most eSIMs auto-connect, but you can manually select one). You can also toggle airplane mode on and off or restart the device to refresh your signal.
4. Activation Failed Completely
If your eSIM just doesn’t activate at all, it’s usually because of one of three reasons — the phone doesn’t support eSIM, you scanned the wrong code, or the plan hasn’t started yet. Also, make sure you’re connected to Wi-Fi during setup. Without the internet, the profile won’t download. If everything checks out and it still doesn’t work, contact the eSIM provider’s support team. Most offer quick chat or email help, and they usually guide you step-by-step without any jargon.
5. Accidentally Deleted the eSIM
Once removed, many eSIMs can’t be reused — especially if it’s a single-use QR. Always avoid deleting the profile unless the provider allows reinstallation. Small issues can come up, but most are easy to fix. Having the right info at hand makes a big difference when using an eSIM for international travel. Don’t let a minor glitch ruin your experience.
Pro tip: Save the QR and setup info in multiple places (email, screenshots, cloud notes) before your trip.
Final Thoughts: Making Every Trip Smoother with an eSIM
Traveling is already stressful — airport queues, time zones, lost baggage. Why add SIM card drama to the list? Switching to an eSIM for international travel is one of the smartest moves you can make. No more hunting for local SIMs. No more surprise roaming bills. Just scan, activate, and stay connected. If you choose the best eSIM for international travel, you get reliable internet from the moment you land. Whether you’re booking a cab, checking hotel directions, or uploading photos, it all happens without a hitch. The key is to buy eSIM for international travel before your trip — from a trusted provider that fits your destination, duration, and data needs. It takes less than 10 minutes to set up, and gives you peace of mind for the entire journey. In short, an eSIM card for international travel isn’t just a convenience — it’s a travel essential. Once you try it, you’ll never go back to physical SIMs again.

Blog Author
Peter
Peter started BazTel.co to make mobile internet easier for travellers. He noticed how tough it was to find good network options while visiting new countries. That’s when he built BazTel — a place where anyone can buy eSIMs online without confusion or long steps. He believes tech should be simple and useful, not complicated. When he’s free, he likes to travel, test BazTel himself, and keep improving it based on real user problems.