 Botswana
 Zambia
 Congo
Congo Colombia
 China mainland
 Chile
Chile Chad
Chad Central African Republic
 Canada
 Cameroon
 Cambodia
 Burkina Faso
 Bulgaria
 Brunei Darussalam
 Brazil
 Aland Islands
 Bosnia and Herzegovina
 Bolivia
 Belgium
 Belarus
 Bangladesh
 Bahrain
 Azerbaijan
 Austria
 Australia
 Armenia
 Argentina
 Algeria
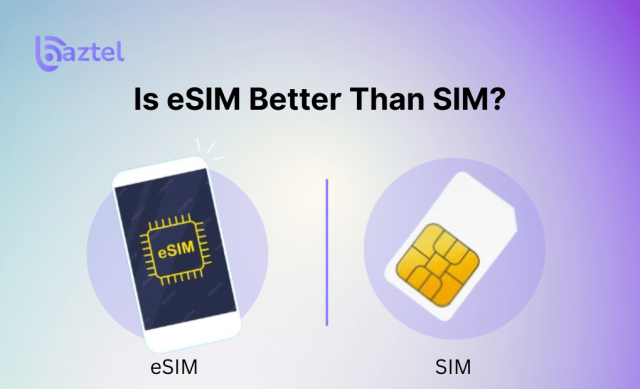

You’ve probably heard people say eSIM is the future. No more physical cards. Just scan a code, and you’re connected. But if you’ve used SIM cards for years, switching to something you can’t even see might feel risky.
That’s why this question matters: Is eSIM better than SIM?
Let’s keep it real. Both have their place. A physical SIM still works well in many cases, especially if you’re using a budget phone or live in a country where eSIM support is limited. But eSIM gives you more control, especially when you travel.
This blog will help you compare the two properly. You’ll learn:
- What exactly is an eSIM and how it differs from a SIM
- Why travelers are making the switch in 2025
- Real-world issues users have faced (based on Reddit and reviews)
- How to get your eSIM QR code step by step
- What to do if your QR code doesn’t work
- Tips to switch easily without losing connection
Before we start, here are two helpful reads if you’re just getting started:
What is an eSIM and How Does It Work?
Physical SIM vs eSIM: What’s Right for You?
What Is an eSIM and How Is It Different from a SIM Card?
An eSIM (short for Embedded SIM) is a tiny chip built right into your phone or device. You don’t have to insert anything. The mobile profile your plan, number, and settings gets downloaded onto your phone using a QR code or activation code.
So, unlike a regular SIM card:
- There’s no tray to open
- You don’t need to visit a store
- You can add multiple plans on one phone
If you’ve ever changed SIMs during international travel or needed dual SIMs for work and personal use, eSIM makes that faster and cleaner.
Here’s how: How to Switch Between Different eSIM Plans on Your Phone
Some premium phones now even come eSIM-only, like the iPhone 14 series in the US. If you’re not sure your phone supports it, do a quick check using this guide: Is My Phone eSIM Compatible?
Want to dig deeper? You can also see how manual eSIM activation works in case your QR doesn’t scan properly.
Want a technical explanation straight from the source? Here’s Apple’s eSIM setup support page and Google’s guide to eSIM on Pixel devices.
eSIM vs SIM: Which One’s Better for Travelers?
When comparing eSIM vs SIM, it’s not just about ditching plastic, it’s about real-world convenience.
A traditional SIM card needs to be physically inserted, replaced, or removed each time you switch plans or travel. If you’ve ever stood in a foreign airport looking for a SIM ejector tool (or using a safety pin!), you already know the struggle.
On the other hand, an eSIM activates digitally. You get a QR code or a carrier link, scan it, and boom you’re connected in minutes. No waiting, no shops, no physical swapping.
Here’s what makes eSIM better:
- You can install an international data plan before you travel
- No risk of losing your home SIM
- Switch between profiles in a few taps
- Eco-friendly, since there’s no plastic waste
If you’re still wondering, is eSIM better than SIM for travel?The answer is yes especially for people who move often or hate long queues at SIM shops.
For a more detailed breakdown, read our Physical SIM vs eSIM comparison.
Want to know what Apple says? See Apple’s eSIM benefits explained.
Where to Find the eSIM QR Code
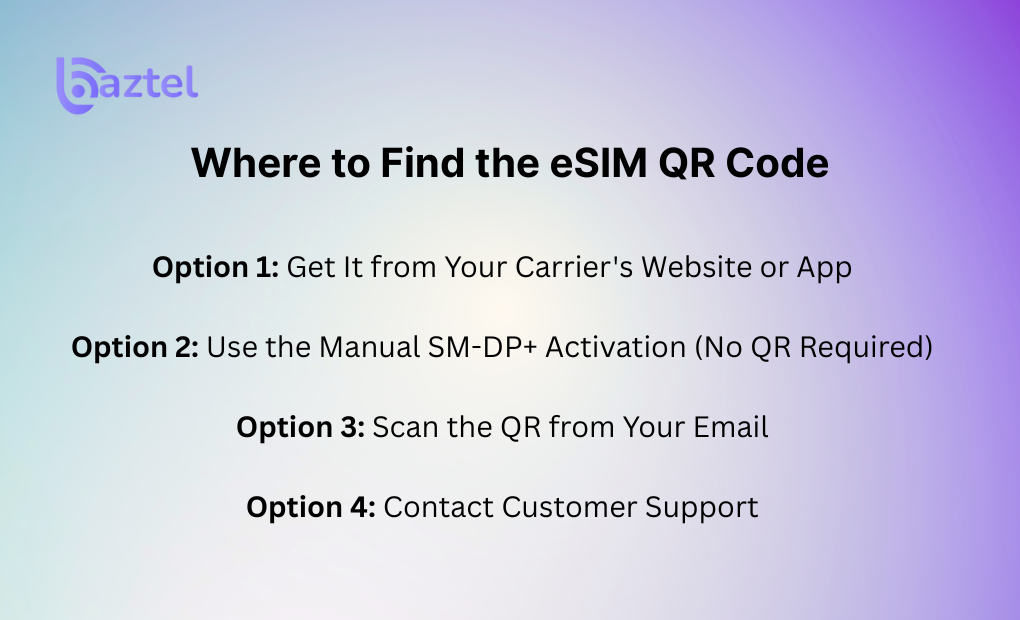
If you’re asking how to get eSIM QR code, the real answer depends on who your mobile provider is and what device you’re using. Most people assume the QR code just appears magically but it doesn’t. Let’s break it down.
Option 1: Get It from Your Carrier’s Website or App
This is the most common method.
Once you purchase a plan, your eSIM QR code is either:
- Shown on the confirmation page
- Emailed to you
- Available inside the carrier’s mobile app or user dashboard
For example, providers like Airalo and Nomad show the QR immediately after purchase. Others like Jio or Airtel in India require you to follow a few verification steps first.
If your code doesn’t show up, here’s a helpful post on how to troubleshoot QR not loading.
Option 2: Use the Manual SM-DP+ Activation (No QR Required)
Some phones let you activate an eSIM without scanning any QR.
You’ll need:
- The SM-DP+ Address
- The Activation Code
These details are provided by the carrier under the “manual activation” option. You can then enter them directly by going to:
Settings > Mobile Network > Add eSIM > Use Activation Code
To see how this works, check this step-by-step manual eSIM activation guide.
Option 3: Scan the QR from Your Email
Many carriers send you the QR via email. But here’s the catch: don’t open that email on the same phone where you want to install the eSIM. The code needs to be scanned from a separate screen.
A common issue users face is trying to scan the code from the same phone’s screen, which simply doesn’t work. You can:
- Open the email on a laptop or tablet
- Take a screenshot and share it to another device
- Print it out (yes, old-school but reliable)
Option 4: Contact Customer Support
If you’ve paid for a plan but still haven’t received the QR code, don’t panic. Go to your carrier’s support portal. In many cases, they’ll resend the code manually or guide you through a direct activation.
For major providers, use:
- T-Mobile eSIM Help
- Verizon eSIM Support
- AT&T eSIM Info
If you’re using global providers, refer to this blog: Best eSIMs for International Travel.
How to Scan the QR Code to Activate eSIM
Once you’ve received your QR code, don’t rush. Many users make small mistakes during this step that stop their eSIM from working. In this section, we’ll walk you through the full scan process separately for iPhone and Android and explain how to avoid the most common activation errors.
iPhone Setup: Step-by-Step QR Code Activation
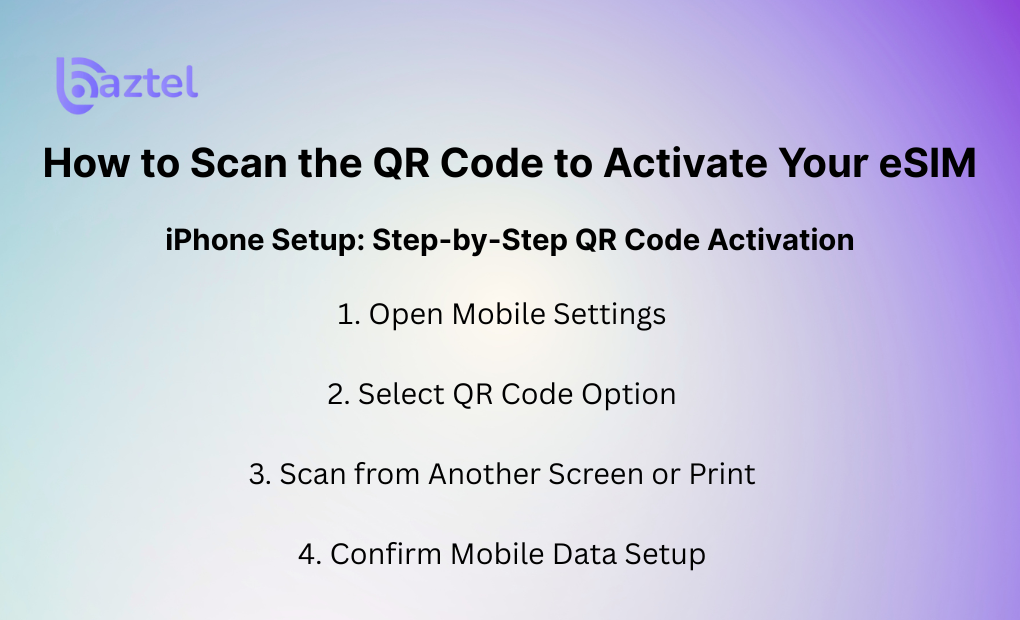
Setting up an eSIM on an iPhone is easy if you follow each step carefully. Here’s how:
1. Open Mobile Settings
Go to Settings → Mobile Data (or Cellular). Tap on ‘Add eSIM’.
2. Select QR Code Option
Choose ‘Use QR Code’ when prompted. If you see ‘Transfer from Nearby iPhone’, ignore that and pick ‘Use QR Code’ instead.
3. Scan from Another Screen or Print
Do not open the QR on the same iPhone. Use a laptop, another phone, or printout. The iPhone camera will scan the code instantly.
4. Confirm Mobile Data Setup
After scanning, you’ll see a pop-up. Tap Continue and follow prompts. You can label the eSIM as “Travel”, “Data Only”, or something else.
If it fails to activate, make sure your iPhone is connected to Wi-Fi.
Related: Read full iPhone setup tutorial
Android Setup: Scan & Activate eSIM Profile
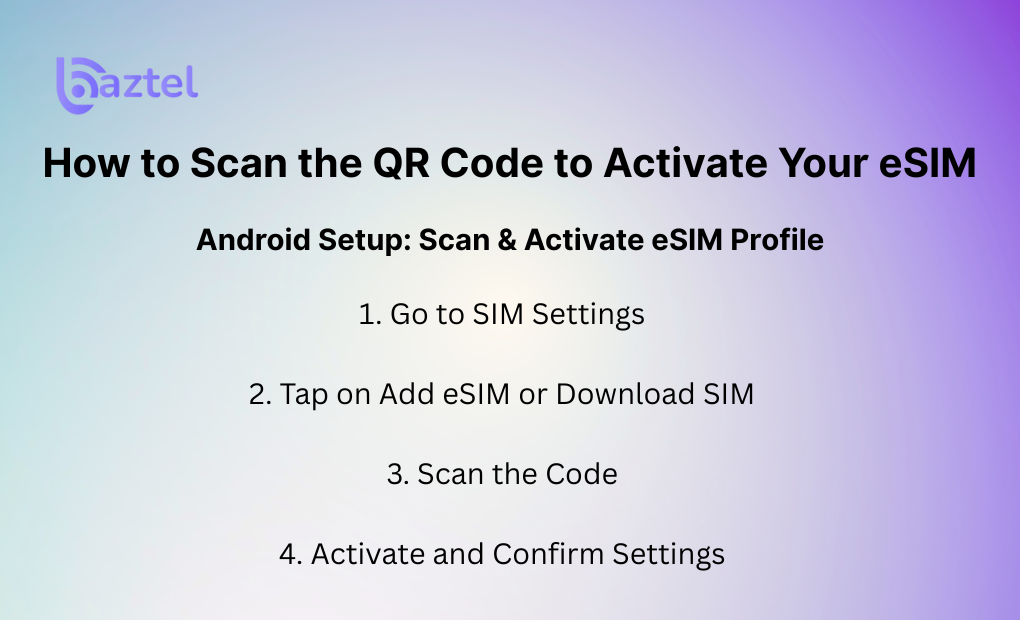
Since Android models vary, the names of settings may be slightly different but the process is mostly the same:
1. Go to SIM Settings
Navigate to Settings → Connections → SIM Manager (or Network & Internet > SIMs)
2. Tap on Add eSIM or Download SIM
Some models show ‘Add eSIM’, others show ‘Download SIM using QR’
3. Scan the Code
Use another screen or print. Open your phone’s camera or scan tool and point at the QR.
4. Activate and Confirm Settings
Once scanned, your eSIM will download automatically.
Make sure to enable the eSIM and select it as the primary data SIM if needed.
Full setup guide: iPhone + Android instructions
Most Common Scanning Mistakes to Avoid
Let’s save you from hours of frustration. These are the mistakes many users unknowingly make:
Scanning the Code on the Same Phone
Your eSIM won’t activate if you open the QR code on the same phone that needs to scan it. Use a second device or print it.
Not Using Wi-Fi During Activation
Your device needs the internet to download the eSIM profile from the carrier. If you’re not connected to Wi-Fi, the process will hang midway.
Expired or Reused QR Codes
Some QR codes have a one-time use policy or a short expiry window. If it says “Invalid code,” contact support.
With Baztel, you can regenerate a fresh QR anytime from your dashboard.
Skipping Mobile Data Configuration
Activating the eSIM alone doesn’t make it work. Make sure you set it as your mobile data line after setup. Otherwise, it will stay inactive.
Still confused? Here’s our activation time breakdown
Troubleshooting Common eSIM QR Code Issues
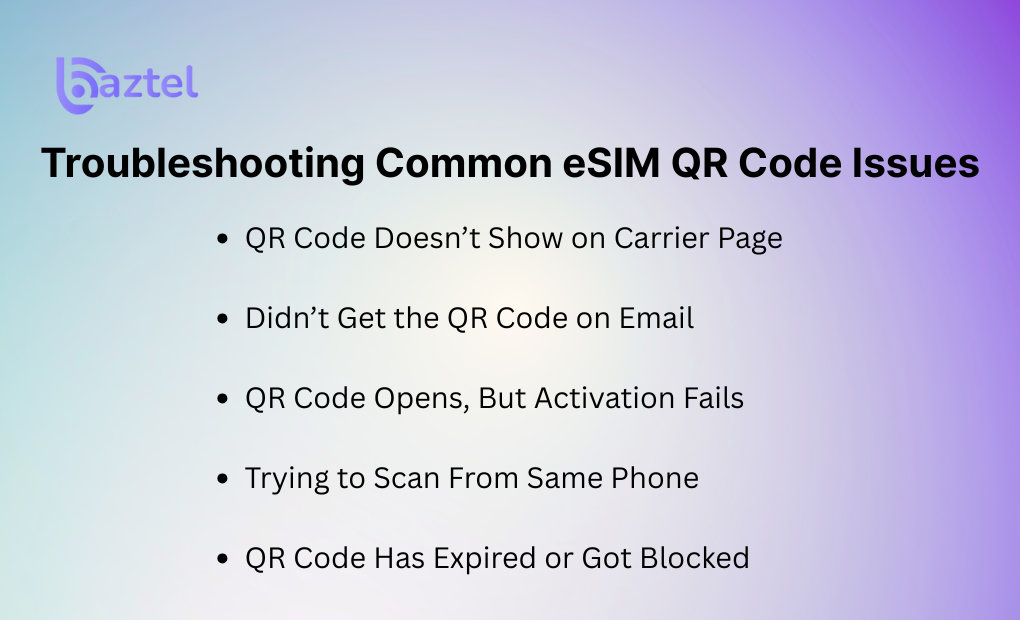
If you’re stuck with your eSIM QR code not working, don’t worry these issues are more common than you think. Below are real-world fixes for the most reported problems, especially when dealing with international travel or switching devices.
QR Code Doesn’t Show on Carrier Page
Some users go through their provider’s portal only to find that the QR code simply won’t load. Either the page glitches, or the code disappears after a few seconds.
What to do:
Try accessing the carrier site on a different browser or device. Also check if you’re logged into the correct account. For some users, clearing the cache or switching to desktop view helped load the code properly.
Didn’t Get the QR Code on Email
A frequent issue is when you complete your eSIM order but don’t receive the promised email. Sometimes it goes to spam, sometimes it doesn’t arrive at all.
What to do:
Check your spam and promotions folders. If it’s not there, go back to your eSIM provider’s dashboard and look for a “Resend QR Code” button. Some providers also offer download options via customer login.
For more insight on plan purchases and email delivery, explore our guide on how to get an eSIM data plan in Europe.
QR Code Opens, But Activation Fails
You scan the code, it detects the profile, but then gets stuck on “Activation Failed.” This could happen if your device is locked to a carrier or your OS is outdated.
What to do:
Update your phone’s software, then reboot. Also make sure the device is unlocked for global use. If it still fails, reset your network settings and try again. Avoid scanning the code multiple times it may expire.
Trying to Scan From Same Phone
This one’s a classic: you open the email or PDF on the phone you’re installing the eSIM on. Obviously, you can’t scan a QR code that’s already on your screen.
What to do:
Use another device (laptop, tablet, second phone) to display the code. If you don’t have one, most providers also support manual setup. Look for the “Enter Activation Code” option on your phone instead of scanning.
QR Code Has Expired or Got Blocked
eSIM QR codes are time-sensitive. Some links or codes expire within minutes or get locked after multiple failed attempts.
What to do:
Contact your provider’s support team and request a fresh QR code. Make sure you haven’t already installed the same profile duplicate installation attempts often block the activation.
For a full understanding of how long eSIM activations typically take, check real-world timelines in this blog post.
Things to Know Before Using Your eSIM QR Code
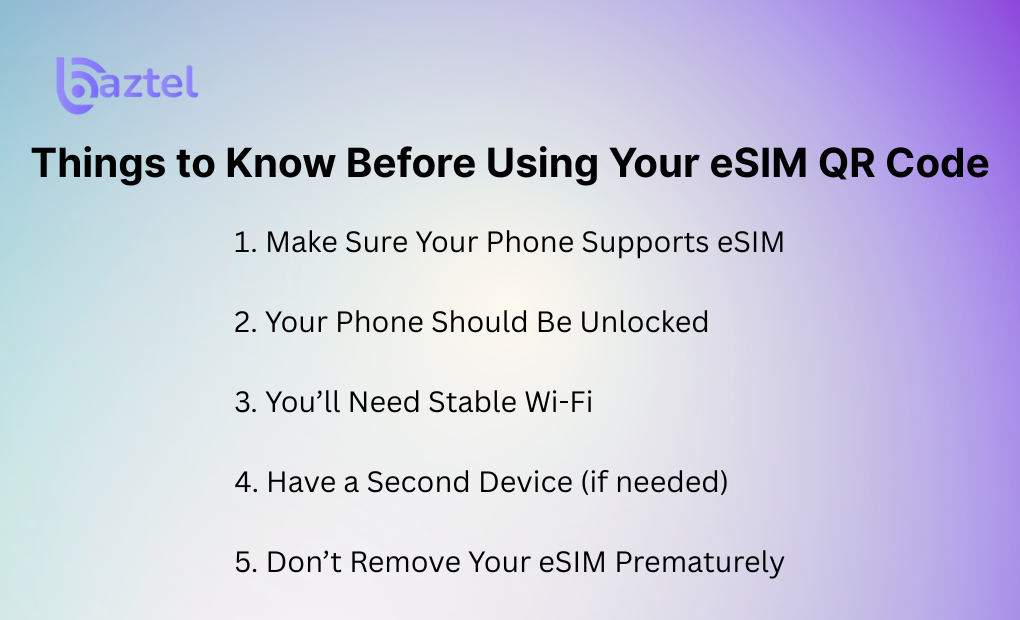
Before you scan that eSIM QR code, a few small steps can save you big trouble later. Many users skip these checks and end up wasting time when activation fails midway.
1. Make Sure Your Phone Supports eSIM
Just because your phone is new doesn’t mean it supports eSIM. Many budget and mid-range models still don’t. You can check using the dialer code *#06# to see if an EID shows up. No EID? That means eSIM won’t work.
For a full guide, check our blog on how to check if your phone is eSIM compatible.
2. Your Phone Should Be Unlocked
If you bought your phone under a carrier contract, it might be locked. eSIMs from other networks won’t work on it until you unlock the device.
Check with your original carrier before you travel or install any new eSIM profile.
3. You’ll Need Stable Wi-Fi
To activate an eSIM, your phone needs to connect to the internet at the time of scanning. Public Wi-Fi might be cut off midway. Make sure you’re using a private or stable connection before starting the activation.
4. Have a Second Device (if needed)
If your eSIM QR code came in an email or app, and you’re trying to scan it from the same phone, you’ll hit a wall. Keep a second screen handy (laptop, tablet, another phone) to display the code.
5. Don’t Remove Your eSIM Prematurely
Once your eSIM is installed, let it activate completely before switching screens or removing it. Some users delete it by mistake and can’t recover the code.
If this happens, check our guide on what happens if you delete your eSIM.
How to Scan the QR Code to Activate Your eSIM
Once your phone is ready, scanning the eSIM QR code is the final step to get connected. But don’t rush to follow each step carefully to avoid common setup errors.
Step 1: Open Settings on Your Phone
On iPhone, go to:
Settings → Mobile Data → Add eSIM → Use QR Code
On Android (varies slightly by brand):
Settings → Network & Internet → SIMs → Add eSIM → Scan QR Code
If you don’t see this option, double-check that your phone supports eSIM or check your phone model in this compatibility guide.
Step 2: Scan the QR Code From Another Device
Use another phone, laptop, or tablet to display the QR code you received via email or app. Your phone’s camera will scan this code, just hold it steady and make sure the code fits inside the frame.
If the QR code won’t scan, make sure:
- Screen brightness is high enough
- There’s no glare or reflection
- You’re not zoomed in too much
Step 3: Wait While the eSIM Profile Downloads
Once the QR code is scanned, your phone will connect to the server to fetch the eSIM profile. This might take 1–2 minutes.
If it fails here, ensure you’re on a stable Wi-Fi connection and try again. If needed, you can also switch to the manual setup method as explained in our manual eSIM activation guide.
Step 4: Set It as Your Default SIM (Optional)
After activation, you can choose whether to use this eSIM for data, calls, or both. You can even rename it (e.g. “USA Trip”) to keep things organized if you have multiple eSIMs installed.
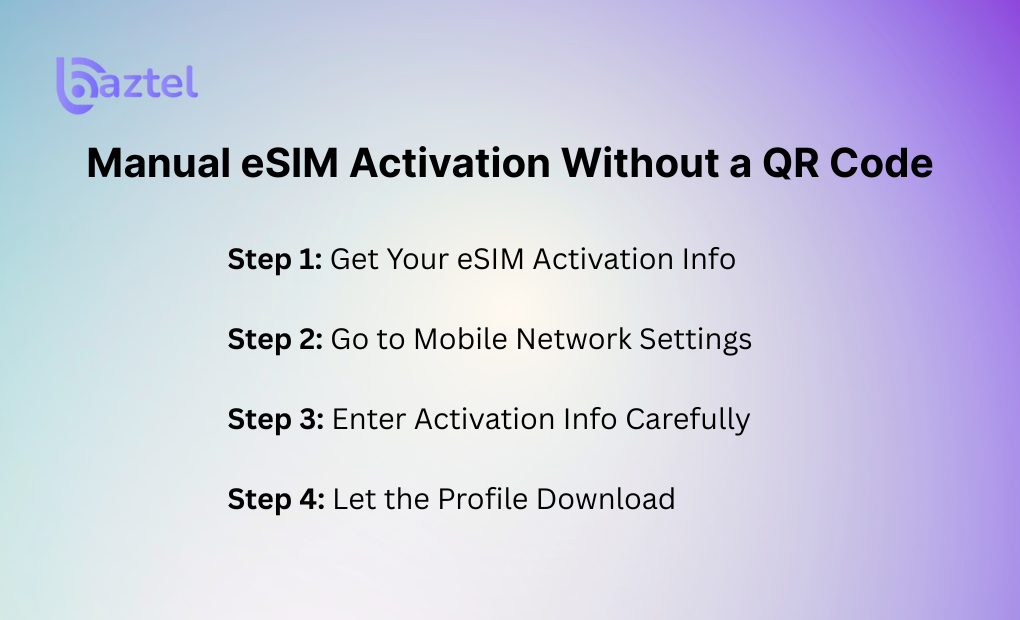
Manual eSIM Activation Without a QR Code
Not all phones or networks need a QR code to activate eSIM. If you didn’t receive one or your phone isn’t scanning it, you can manually enter the activation details. This process works especially well for Android devices or when using eSIMs from providers like Baztel.
Step 1: Get Your eSIM Activation Info
Your provider (like us) will send you:
- SM-DP+ Address (eSIM activation server)
- Activation Code or Matching ID (optional)
Find this in your confirmation email or the provider dashboard. Don’t make changes to the address unless instructed.
Example SM-DP+ Address:
gs.sm.vodafone.com
Some users also receive a Confirmation Code, but most phones skip this if not needed.
Step 2: Go to Mobile Network Settings
On Android:
- Settings → Connections → SIM Manager → Add eSIM
- Tap Enter Activation Code or Use activation code manually
On iPhone (iOS 17 and up):
- Settings → Mobile Data → Add eSIM → Enter Details Manually
Step 3: Enter Activation Info Carefully
Paste or type the SM-DP+ Address exactly as shared. If there’s an activation code, enter that too. Avoid typos even if a single mistake will block setup.
If your phone shows “No eSIM found” or “Cannot connect to server,” double-check Wi-Fi is on and try again after a few seconds.
Step 4: Let the Profile Download
After entering the correct details, your phone will fetch and install the eSIM profile. This may take a minute or two. Once done, it’ll prompt you to set a label (like “Baztel Travel”) and confirm your preferences.
How Long Does It Take to Activate eSIM?
Most eSIM activations finish within 5 to 15 minutes, but the total time can vary based on your device, carrier, and internet connection.
1. Instant Activation via QR Code
If you’re using a QR code on a supported phone like an iPhone or Samsung Galaxy, activation usually starts the moment you scan. It takes around 2–3 minutes to download the profile and get connected. But sometimes, it gets stuck in the “activating” phase if the signal is weak or you’re switching from another SIM.
2. Manual Setup Can Take Longer
If you enter the activation details manually (especially on Android), expect it to take around 10–15 minutes depending on how fast your phone communicates with the carrier server. If your Wi-Fi is unstable, it might need a second attempt.
3. Provider-Side Delays
Sometimes the delay is not on your side. If your eSIM provider is verifying your plan or running background checks (some ask for KYC or payment verification), it can take a few hours. Always check the confirmation email or dashboard for real-time status.
4. Activation on Travel Plans
If you bought your eSIM before leaving and chose a travel plan (like these), activation may begin only after landing in the destination country. That’s by design to avoid accidental usage.
More details here: How Long Does It Take to Activate eSIM?
What Happens If I Delete eSIM?
Deleting an eSIM might seem harmless, but it can lead to connectivity loss, plan resets, or even data loss depending on your provider and timing.
1. You’ll Lose Access Instantly
Once deleted, the eSIM profile is removed from your phone. You won’t be able to make calls, use data, or send texts linked to that plan. This can be a major issue if you’re traveling or relying solely on eSIM.
Learn here: What Happens If I Delete eSIM?
2. You Might Not Get It Back
Some providers allow you to re-download the eSIM using your original QR code or login dashboard. But others issue single-use codes once deleted, they won’t work again. Always check your provider’s reactivation policy.
Tip: If you’re using a BazTel eSIM, we support free reissue in most cases. Just contact support and mention your original order ID.
3. Plan Validity Doesn’t Pause
Deleting the eSIM does not pause the validity of your plan. Whether it’s a 7-day or 30-day plan, the clock keeps ticking even if you’re not using it. So avoid deleting unless you’ve already switched or completed your trip.
4. Manual Reactivation May Be Needed
In rare cases, if you re-add a deleted eSIM manually, you’ll need to re-enter SM-DP+ server and activation codes.
Is eSIM Better Than SIM?
Switching from a traditional SIM to an eSIM isn’t just a trend, it’s a shift in how mobile connectivity works. But is eSIM really better than a physical SIM? Let’s break it down practically.
1. No Plastic, No Shipping, No Waiting
With physical SIMs, you often need to visit a store, wait for delivery, or carry extra SIM cards while traveling. eSIMs eliminate all that. You can activate a plan instantly right from your phone without inserting anything.
Need proof? Read how it works in our full guide: What is eSIM and How Does it Work?
2. One Phone, Multiple Plans
If you travel often, eSIM is a game changer. Most eSIM-compatible phones support dual SIM functionality meaning you can keep your main number active while using a local or travel data plan on the side. No need to swap out your home SIM.
Check out this traveler-focused breakdown: Best eSIM Plans for Frequent Travelers
3. Better for the Environment
No packaging. No shipping fuel. No plastic waste. eSIMs are digital by design, making them a greener alternative. It’s a small shift that reduces e-waste and supports sustainability efforts, especially helpful if you’re managing multiple devices.
4. Instant Setup, No Store Visits
Getting a new SIM while abroad often means finding a store, showing your ID, and hoping your phone’s not locked. With eSIMs, you scan a QR or install via app, and you’re live within minutes.
Here’s the setup process simplified: How to Set Up eSIM on iPhone and Android
5. The Only Catch: Compatibility
eSIM does require a compatible device. While most iPhones after XS and Androids after 2020 are good to go, it’s always smart to check.
eSIM vs SIM: Which One’s Better for Today’s Traveler?
Let’s not sugarcoat it; both SIM and eSIM have their place. But if you’re someone who travels often, values speed, or just wants less hassle, eSIM clearly has an edge. Here’s a practical breakdown.
Device Setup
| Feature | Physical SIM | eSIM |
| Requires inserting/removal | Yes | No |
| Setup time | Takes 10–15 minutes | Instant (1–2 mins) |
| Needs store visit | Often required | Not required |
| Can be done remotely | No | Yes |
Travel Convenience
| Feature | Physical SIM | eSIM |
| Keep home number + travel plan | No | Yes |
| Change plans on the go | Needs manual SIM swap | App-based or QR scan |
| Global coverage options | Limited per provider | Wide variety via eSIM marketplaces |
For tips on how eSIM helps while traveling, check this: How to Use an eSIM for International Travel
Security & Backup
| Feature | Physical SIM | eSIM |
| Easy to lose | Yes | No physical component |
| Can be cloned or stolen | Yes | Harder to tamper |
| Remote disabling possible | No | Yes, via carrier |
eSIM offers better security because there’s no card to steal or misplace.
Environment Impact
| Factor | Physical SIM | eSIM |
| Uses plastic | Yes | No |
| Requires logistics & packaging | Yes | No |
| Better for environment | No | Yes |
Curious about eco benefits? Advantages of eSIM
Verdict? If your phone supports it, eSIM beats physical SIM in most cases from setup speed and travel use to security and sustainability. It’s the smarter, more flexible choice in 2025.
Final Thoughts: Is eSIM Better Than SIM?
Still thinking, is eSIM better than SIM? If you travel often, want flexibility, or hate waiting in queues for a new SIM card the answer is yes. eSIM makes your life easier. You can switch networks, scan a QR code, and get connected within minutes. No more worrying about losing your SIM or carrying multiple cards while travelling abroad.
Plus, it’s safer. Your eSIM can’t be physically stolen. And it’s perfect for dual profiles, one for work and one for travel.
But it’s not just about convenience. eSIM also reduces plastic use and aligns with how modern phones are being designed. So if your phone supports eSIM, it’s time to leave old-school SIMs behind.
👉 Check eSIM support on your phone
👉 Compare top global travel eSIM plans
Frequently Asked Questions
1. How do I get an eSIM QR code from my provider?
You can usually get it from your carrier’s app, email, or website after buying a plan. If you’re unsure where to start, check out our guide on how to get eSIM QR code which explains everything clearly.
2. What to do if the eSIM QR code is not working?
First, check if your phone supports eSIM. Then, ensure your camera is focused and your internet is stable. Still not working? Try manual eSIM activation using the SM-DP+ code from your provider.
3. Can I activate an eSIM without scanning a QR code?
Yes, you can. Many devices allow manual setup by entering details like activation code and SM-DP+ address. You’ll find full steps in this manual activation guide.
4. What happens if I delete my eSIM by mistake?
Don’t panic. It depends on your carrier. Some let you re-download, while others require a new QR. Here’s what you need to know about what happens if you delete your eSIM.
5. How long does it take to activate an eSIM?
Usually, eSIM activation is instant. But depending on your provider and phone, it might take a few minutes. Read this activation time guide to know what’s normal and what’s not.

Blog Author
Peter
Peter started BazTel.co to make mobile internet easier for travellers. He noticed how tough it was to find good network options while visiting new countries. That’s when he built BazTel — a place where anyone can buy eSIMs online without confusion or long steps. He believes tech should be simple and useful, not complicated. When he’s free, he likes to travel, test BazTel himself, and keep improving it based on real user problems.


